Image Details
Clicking on a camera trap image thumbnail in either the List or Card view in Manage Images will take you to the Image Details screen for that image.
From the Image Details screen, you can
View image metadata (filename and type, dates uploaded and taken, who uploaded the image)
View camera details (name, description, GPS co-ordinates)
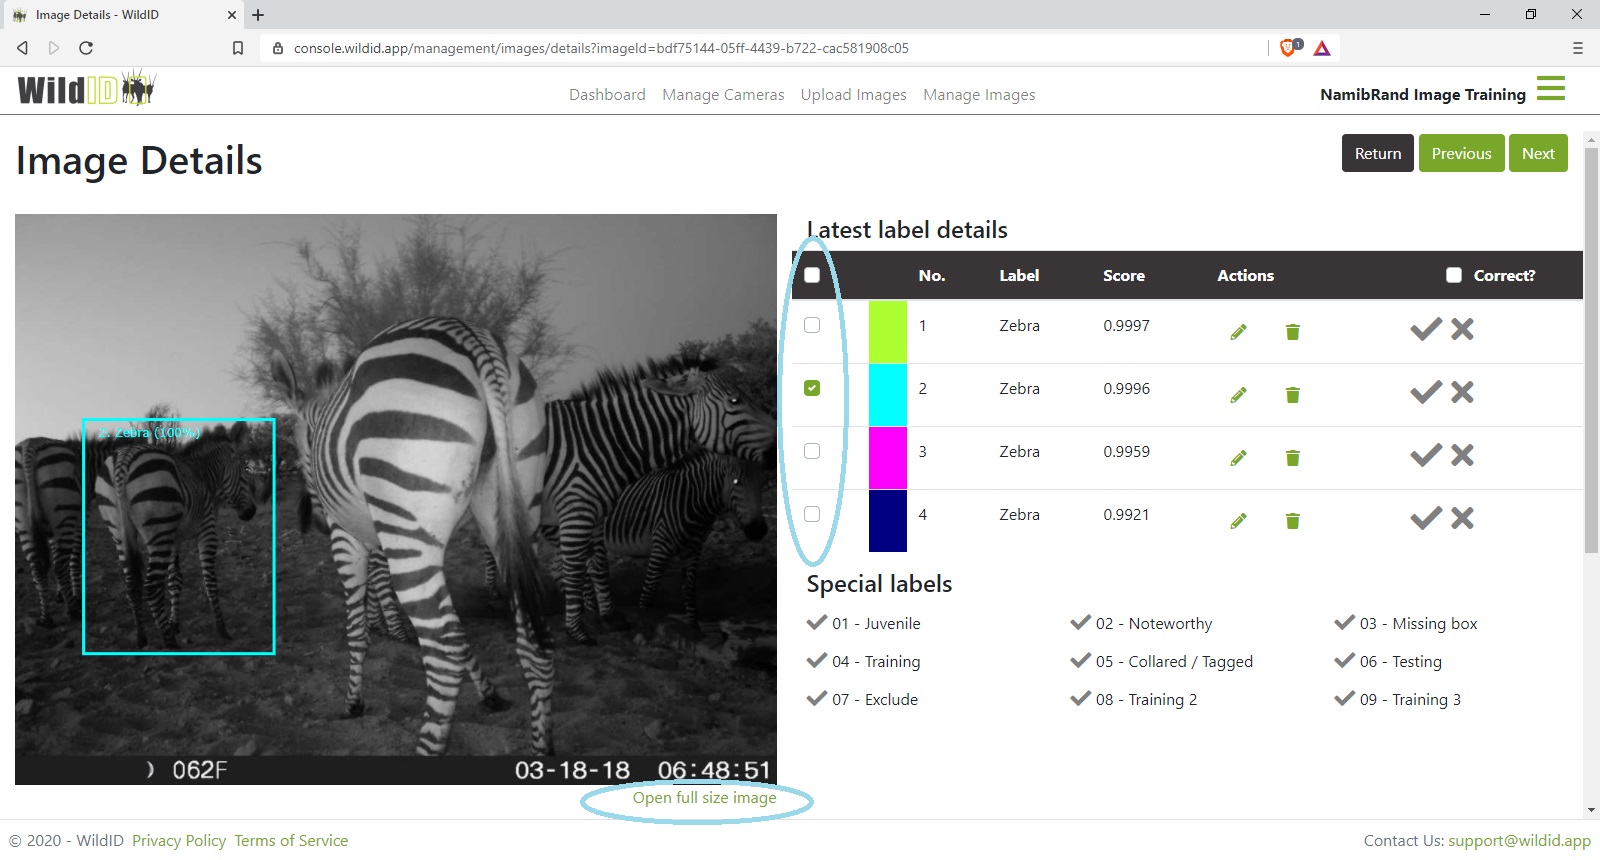
View the image at a reasonable size, as well as opening the fullsize original image
Download the image
View boxes and species labels currently added to the image
Edit, delete or verify labels
Edit boxes (move or resize)
Add special labels to the image
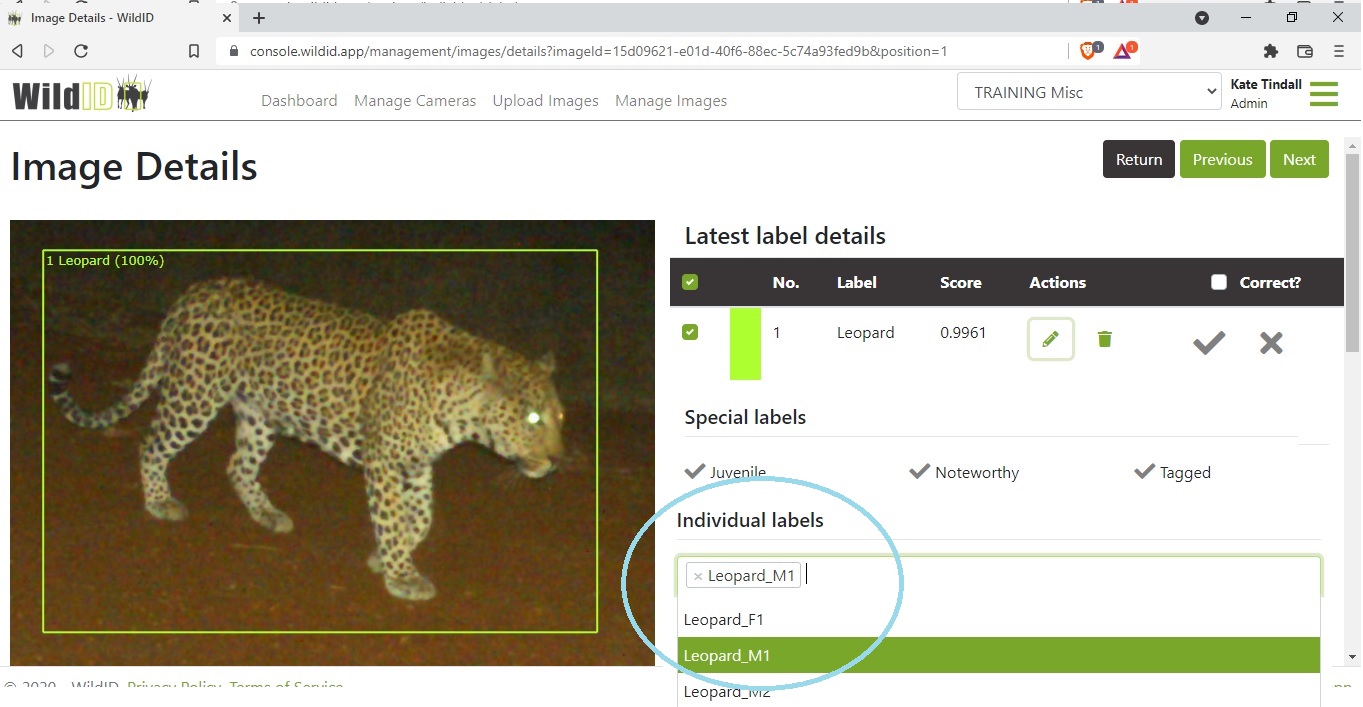
Add indiVidual labels to the image
Add notes to the image
View a filmstrip of images at the same camera within 5 minutes before and after your current image
Navigate to the next or previous image in the list (based on your current filtered/sorted list), or return to the Manage Images list.
Verify labels
What is verification, and do I need to do it?
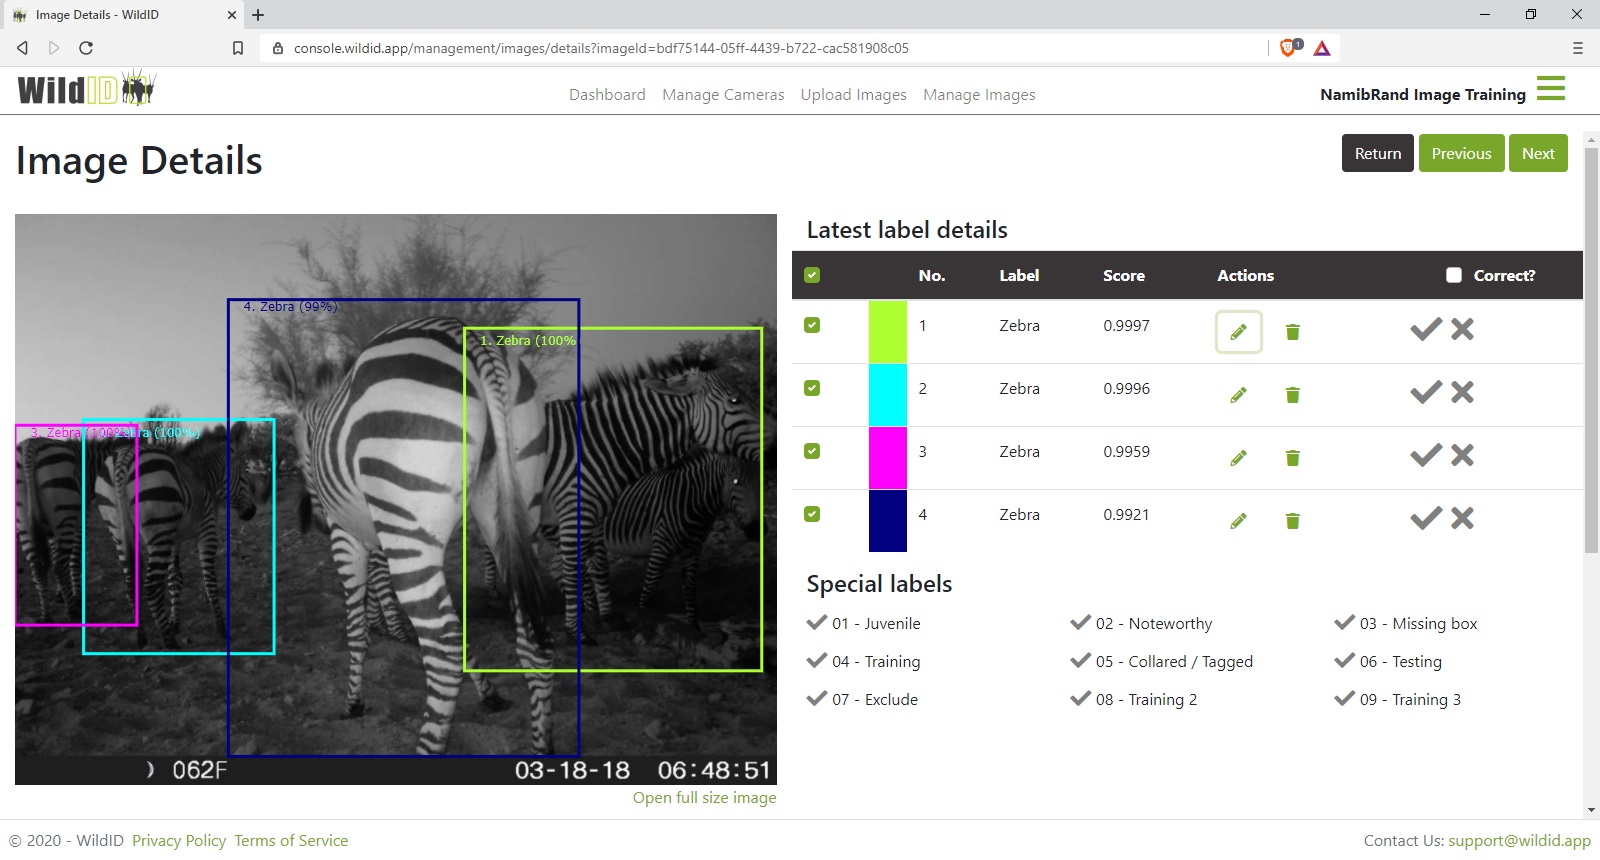
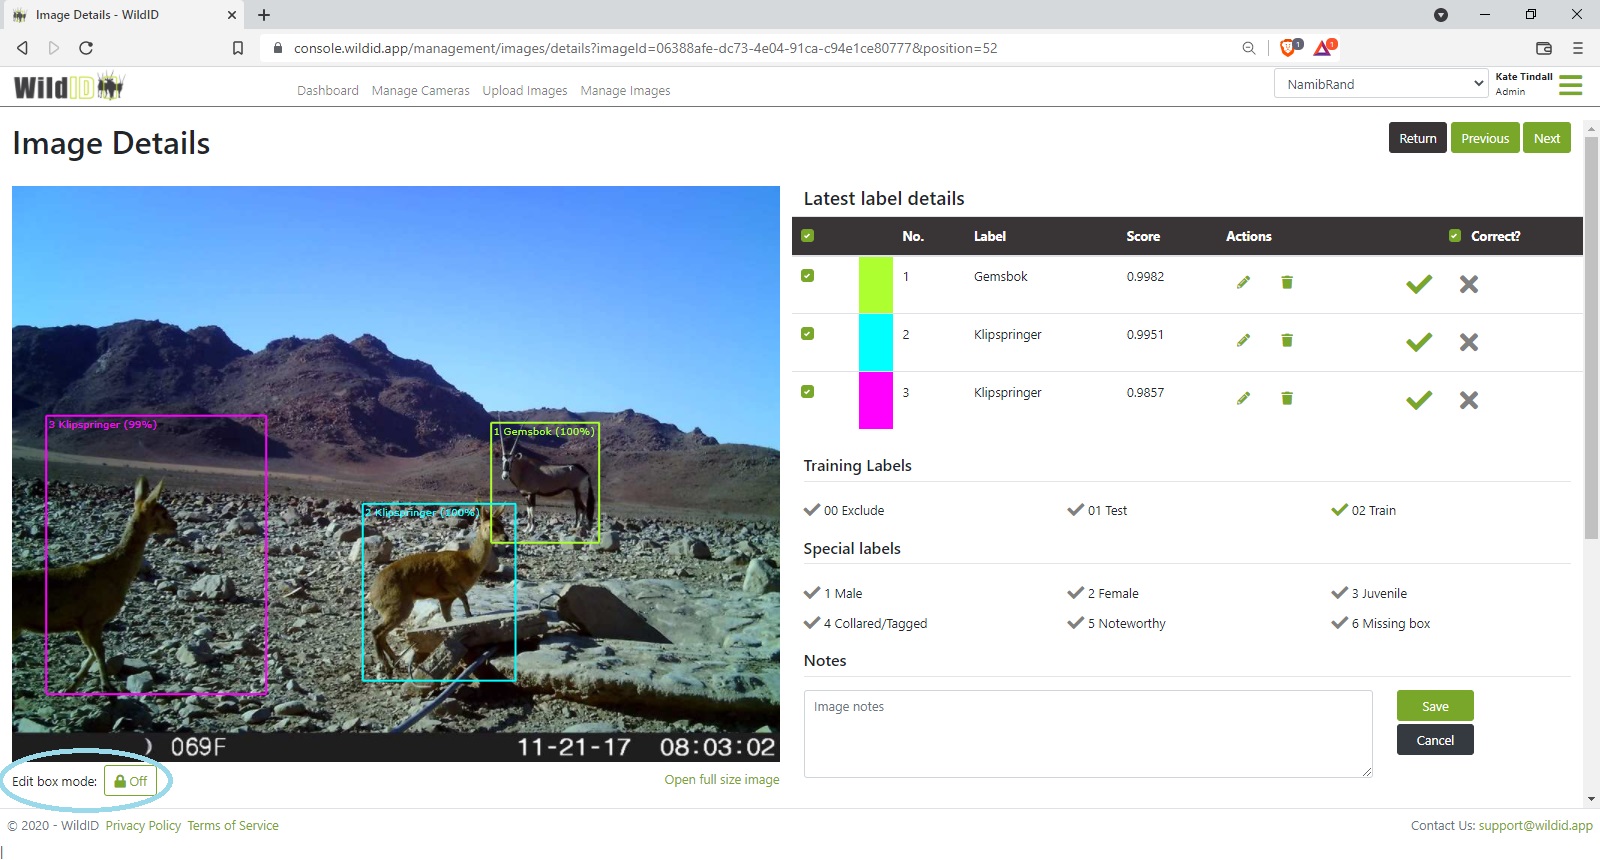
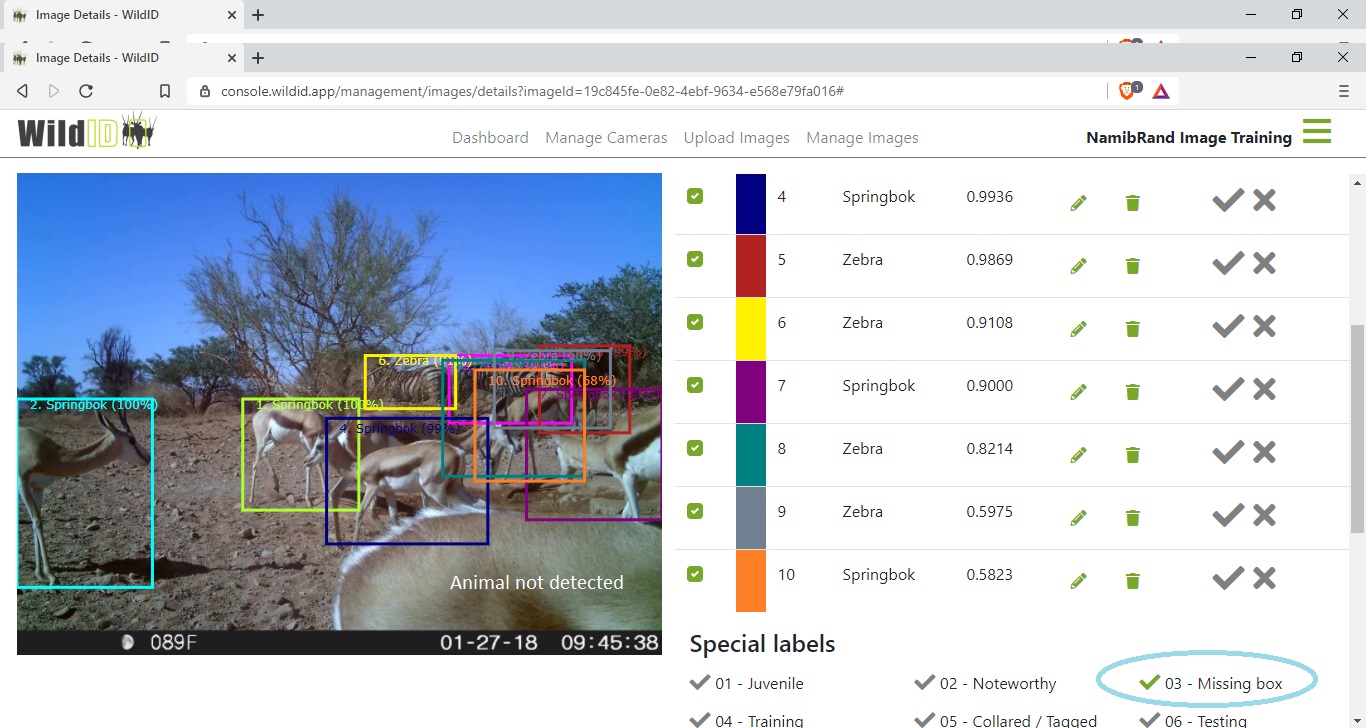
After WildID has detected an image, it places bounding boxes around each animal or object it finds in the image, and labels it with the species that it has recognized, along with a score indicating how confident it felt about the prediction.
The image details screen will show each box in a different colour, and a table showing the label and score for each coloured box.
You can now optionally verify the predictions as correct or incorrect (or edit or delete them).
You do not need to verify labels, but sometimes WildID does misclassify objects. The current label will be used in species counts in the Dashboard, in the export data CSV, and in the search screens, so if you have an image of a jackal that has been misclassified as a fox, the image will be listing fox in all of these places.
If you export your images, and request the species label to be written into the EXIF data of the image, WildID will use any labels that are unverified or verified as correct (not those marked as incorrect). In our jackal example above, the EXIF data of the jackal image will be updated with the label “Fox”.
Depending on how accurate you need your data to be, you will probably want to verify and edit incorrect labels. You may choose to do so only for species of special interest, or over time for all images.
Typically, if an object is incorrectly recognized and you know what it actually is, you will edit the label to the correct species (which will mark it automatically as verified correct), rather than marking it as incorrect. However, if you don’t know what the animal is and would like to come back to it later or refer it to someone else to check you can mark it as incorrect and later filter to find those images.
How to verify labels
If the image is not clear, use the Open full size image link to open the original image and get a good look at it. The original image will not have bounding boxes or labels on it.
If there are many and confusing boxes, you can show and hide each box individually using the checkboxes next to the relevant colour in the table. This will not delete the box or label, but temporarily hide it on the image.
Use the tick and cross icons to the right of the label in the table to verify each label as correct or incorrect.
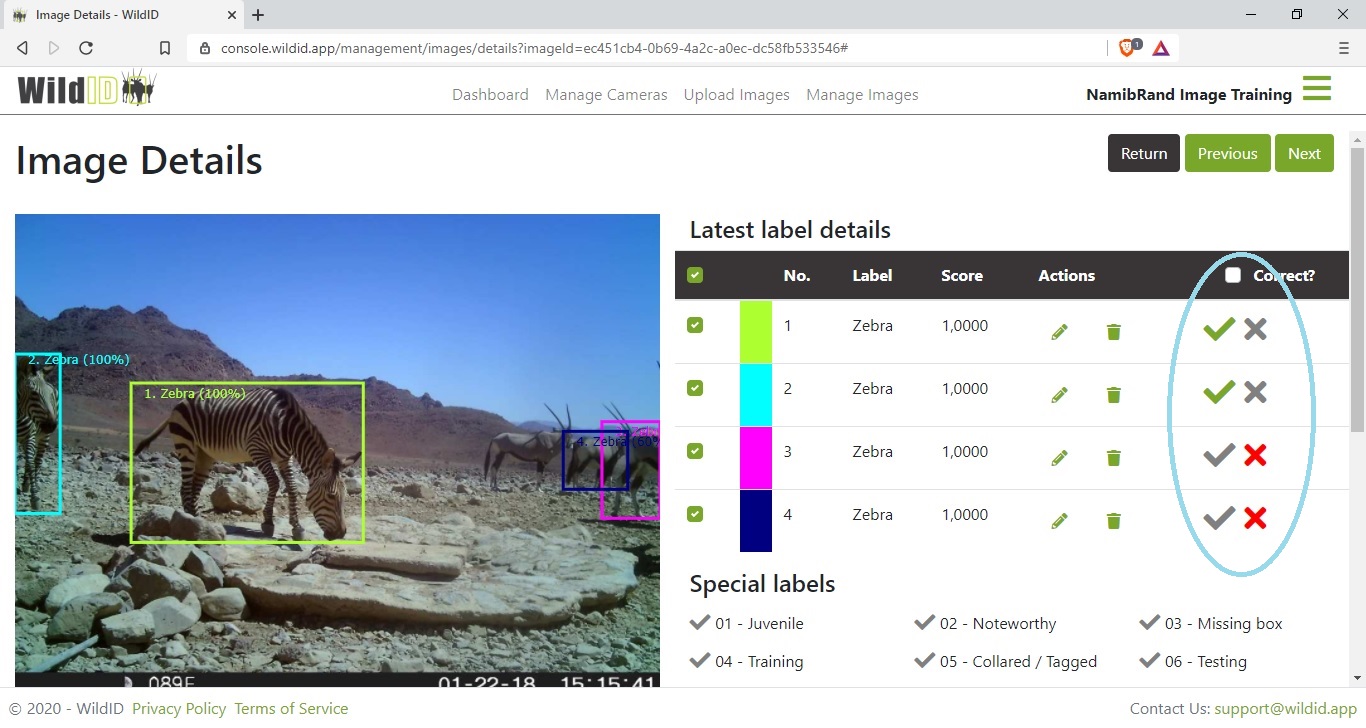
If all of the labels in the image are correct, use the checkbox in the Correct? column heading to verify them all as correct in one go.
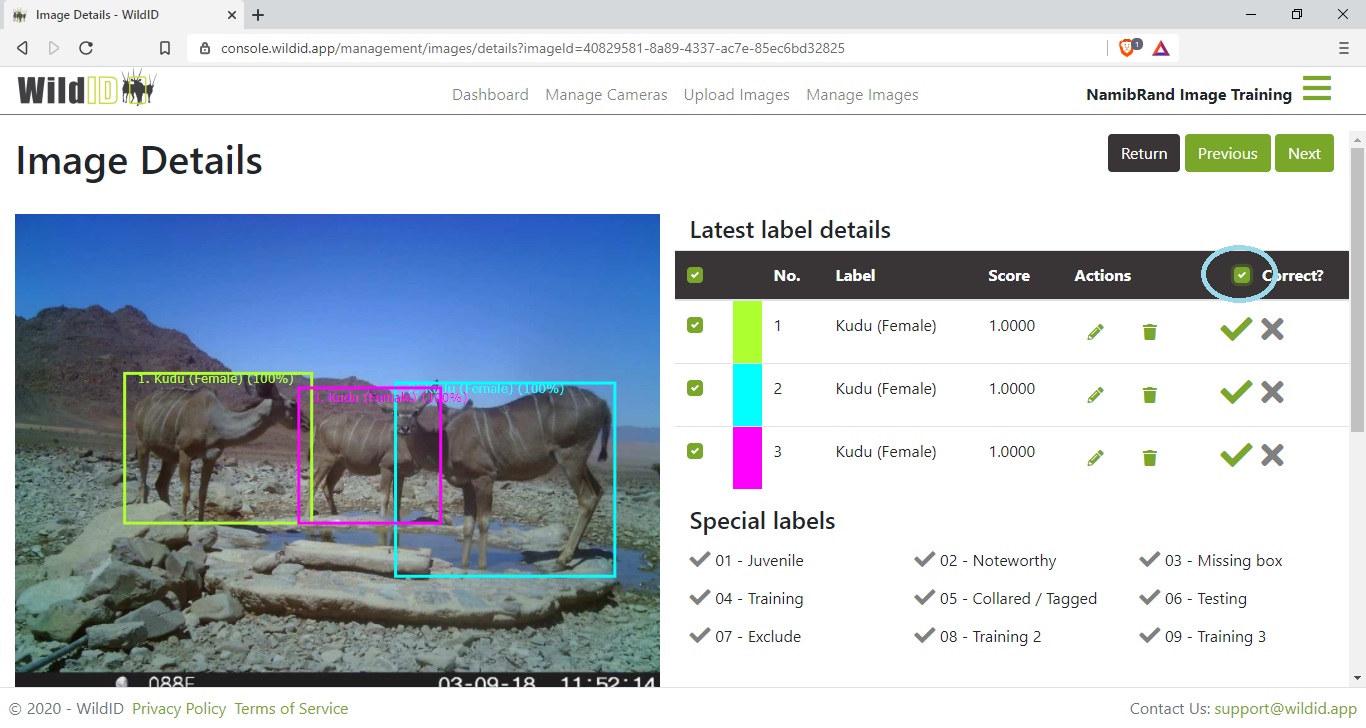
When you verify labels as either correct or incorrect, the score changes to 100%.
WildID also stores which user made the change, and when.
In the Image Details screen you can verify individual labels as correct and incorrect (and a combination), but in the Card view you can verify all labels in the image as correct or incorrect in one go. This is a much faster way to work if the images are clear enough in Card view.
See also Verify all labels in an image from Card view.
Roadmap:
We will shortly add extra details to the labels section to show who made a change, and when. We are already storing this data.
Edit labels
If an animal has been incorrectly recognized by WildID, you can edit the label.
Click on the pencil icon to edit a label.
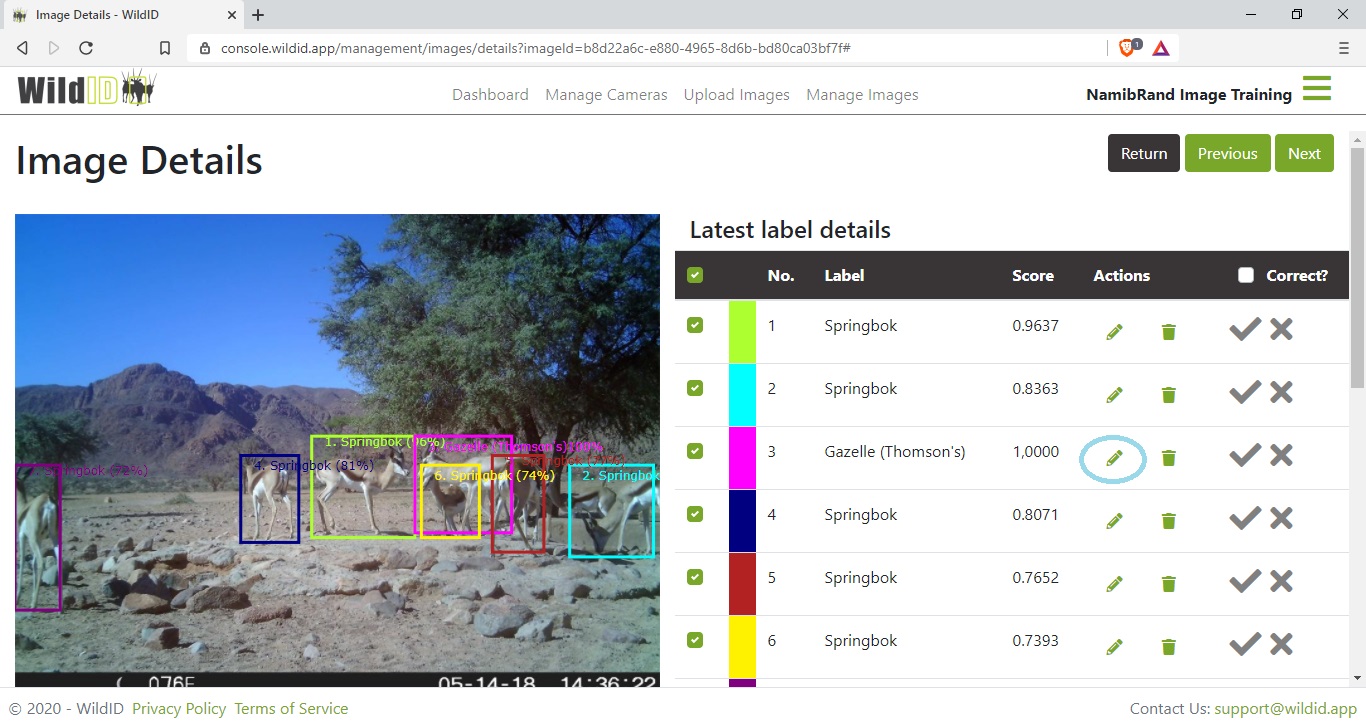
In the dropdown, select the correct species from the list. You can start typing part of the name to find matching entries.
Confirm your save.
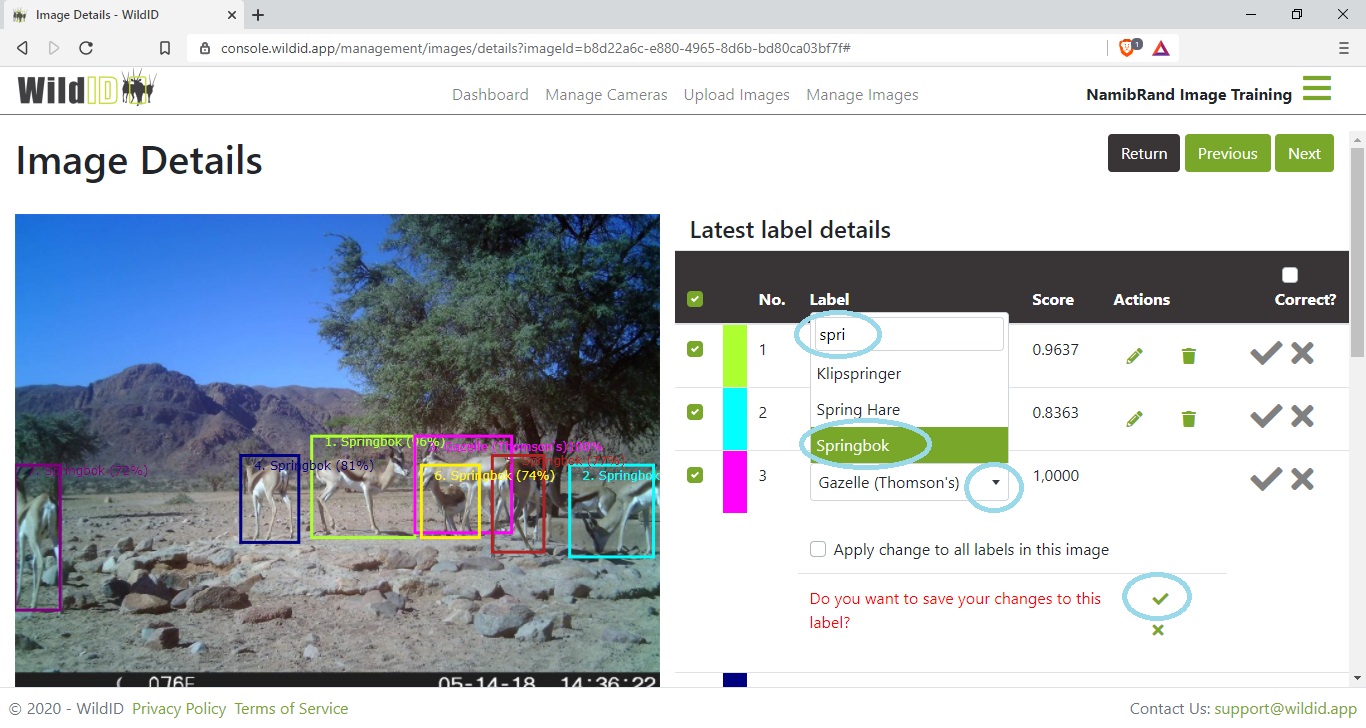
If all of the labels in an image are incorrect (say it is a group of springbok that have all been recognized as Thomson’s Gazelle), you can change all labels in an image at the same time by using the checkbox next to Apply to all labels in this image, then confirming your save.

If you edit a label, WildID will change the score to 100% and verify the label as correct for you automatically.
If the species that you want to change a label to is not present in the dropdown list, please contact us to add it for you. There is also an Other species that can be used in the meantime, and recategorized later when more species are added.
In some cases, WildID recognizes only broad groupings of species, for example Zebra, but we have included sub-groups such as Burchell’s and Mountain Zebra in the dropdown list. You can edit the label to be more specific if you would like to.
See also Species list.
See also Re-map labels for automatic re-mapping of one species label to another.
Roadmap:
We will shortly add extra details to the labels section to show who made a change, and when. We are already storing this data.
Delete labels
Sometimes WildID is not sure what an animal is, and makes two guesses (two boxes and two labels for the same animal). In this case you will want to delete the extra box.
If you delete a label, it cannot be retrieved.
Use the bin icon next to the label to delete a box, and confirm your deletion.
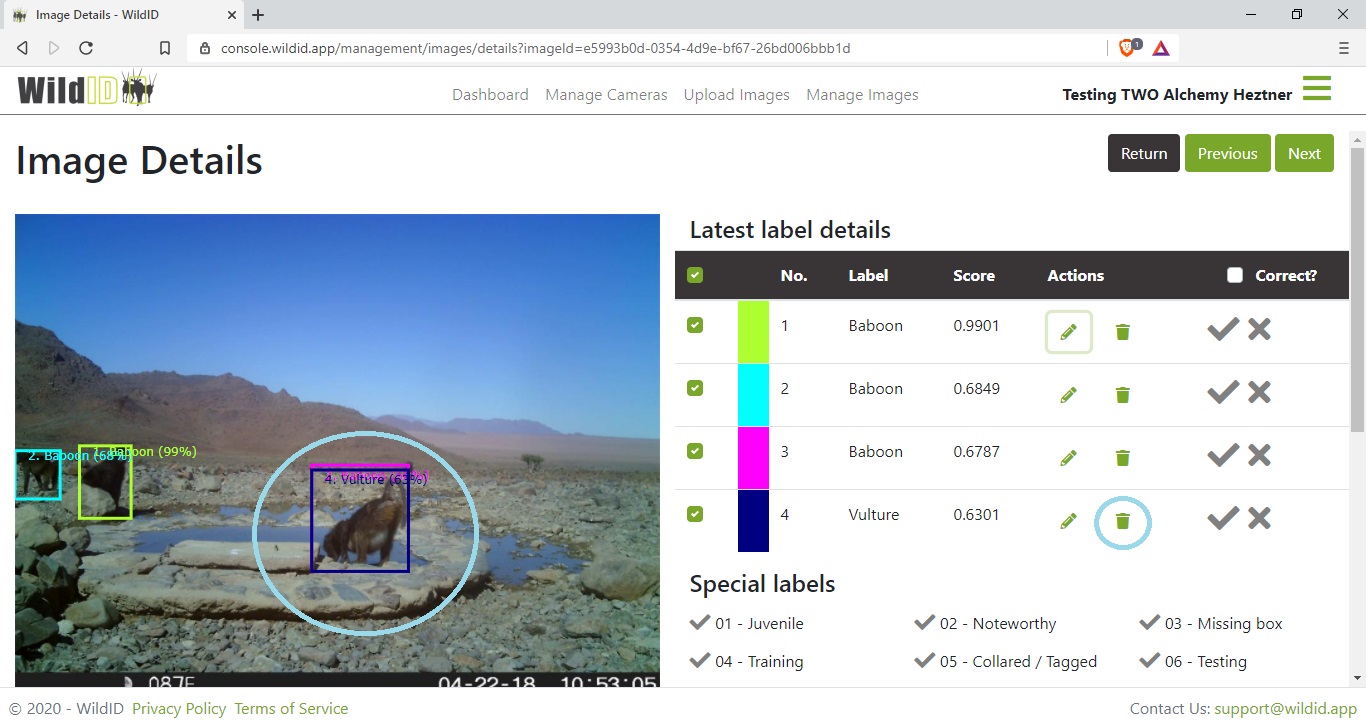
If there are many boxes in the image, it is recommended to ensure that you are deleting the correct one by isolating it in the image – hide all the other boxes in the image temporarily with their checkmarks on the left of the table - so that you are sure you are deleting the box you intend to.
Delete the box that is less well drawn on the animal, not necessarily the one with the correct label. You can always edit the label on the remaining, better box.
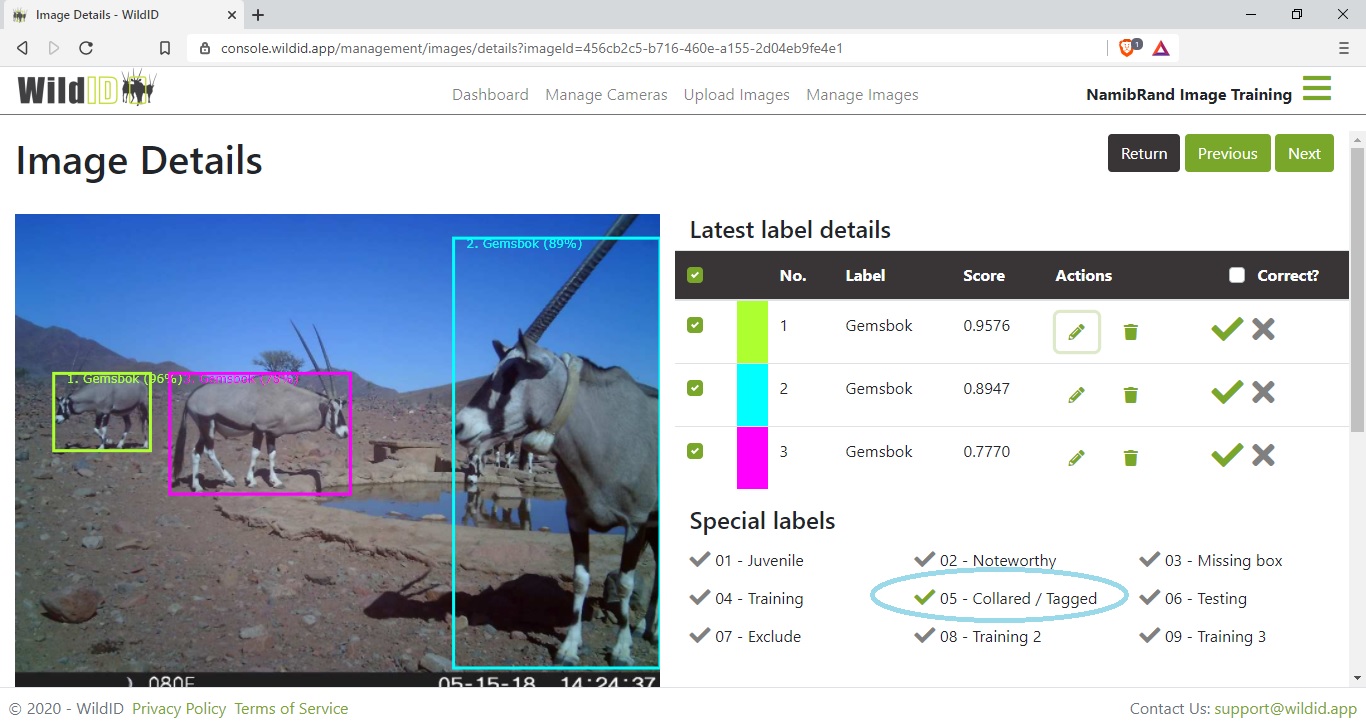
Special labels
Special labels can be added to images to indicate for example when there is a Juvenile present, or a tagged or collared animal.
The special label applies to the image as a whole, not to an individual object in the image.
The model will not recognize and add these special labels, they are only for you to add.
You can add a special label before or after detection.
The tick toggles on and off to add or remove the special label.
You can filter on Special labels, to find (for example) all images with Juveniles in them, and special labels are also included in the CSV data export.
See also Settings: Special labels for defining your own Special labels with which to tag images.
Roadmap:
In time, if we collect enough data, images that have been labelled as “Juvenile” or “Collared” for example, we will be able to train the model to recognize these attributes.
Individual labels
Individual labels can be added to images to mark recognised individuals of a species.
The individual label applies to the image as a whole, not to an individual animal in the image.
The model will not recognize and add these individual labels, they are only for you to add.
You can add a individual label before or after detection.
Select an individual label from the dropdown list to add it to the image (it will save automatically). Use the cross icon to remove the label.
You can add multiple individual labels to the same image.
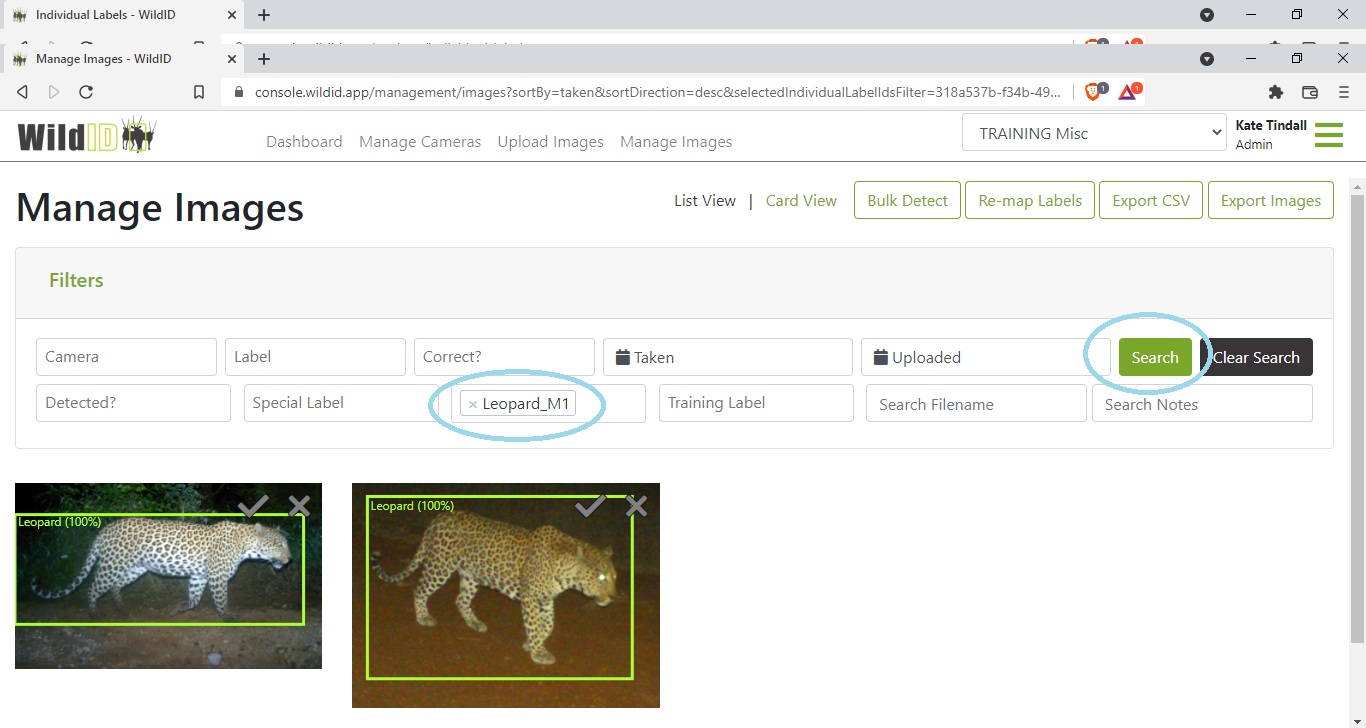
You can filter on individual labels, to find all images of a specific individual, and individual labels are also included in the CSV data export, as well as written into the EXIF data of the image if you re-export it.
See also Settings: Individual labels for defining your own individual labels with which to tag images.
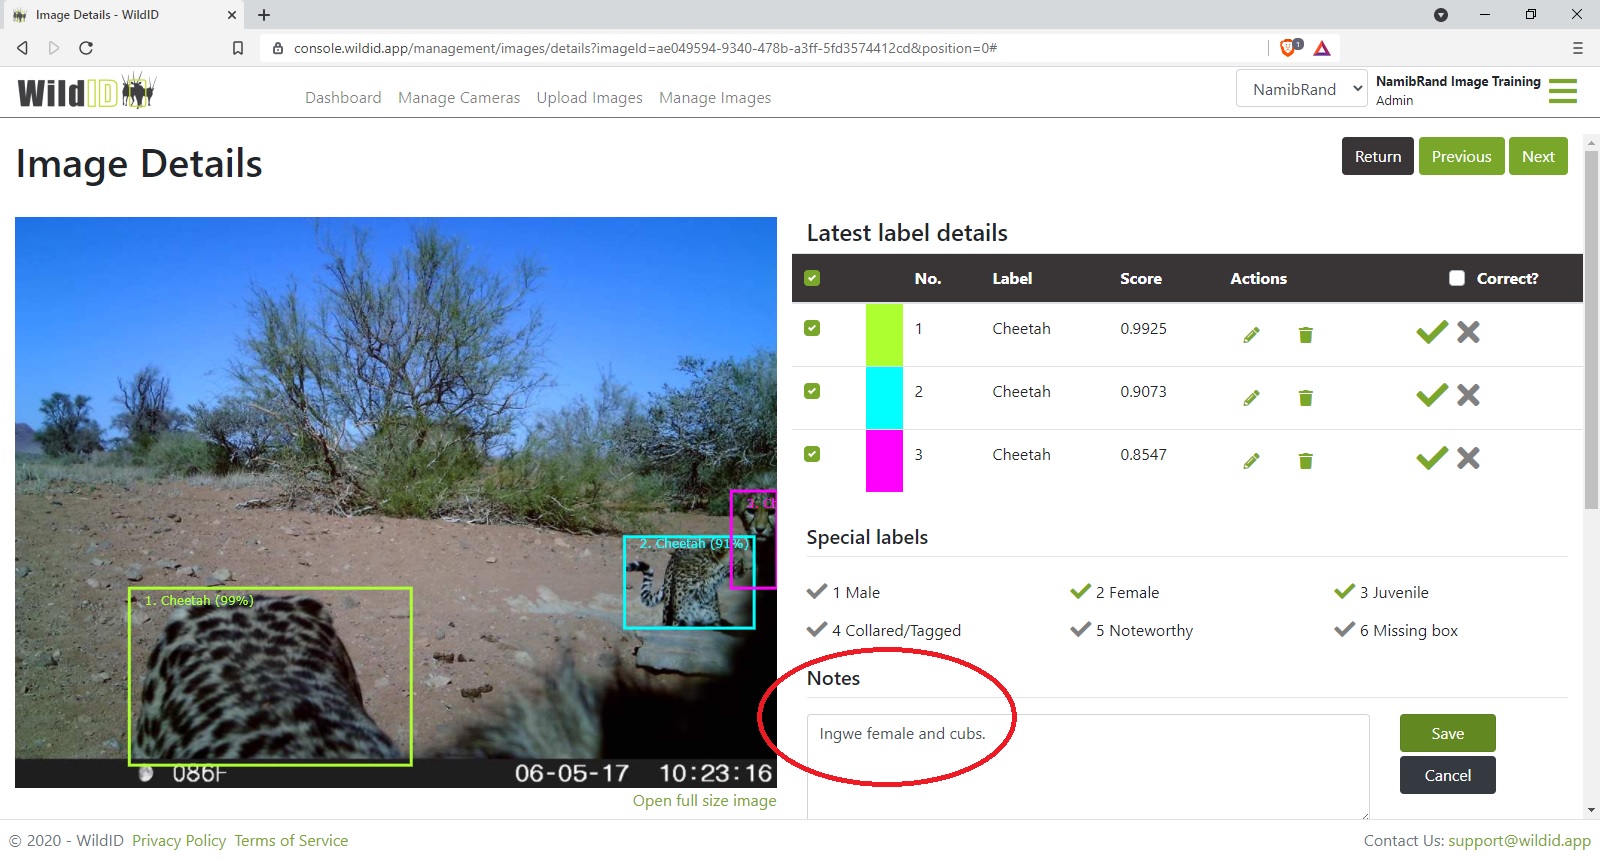
Notes
Free-format text Notes can be added to images. You can use this field to note animal condition or behaviour, or even to identify an individual animal by name/number where you recognise it.
The notes apply to the image as a whole, not to an individual object in the image.
You can add a note before or after detection.
Click the green save button to save your notes. (This save button only applies to notes. Any other changes on the page, for example to labels or special labels are saved automatically.)
If you have saved a note and now wish to delete it, just delete/backspace the text and then resave the empty textbox.
If the notes input box is too small to view the whole note, resize it by dragging the handle in the bottom right-hand corner of the input.
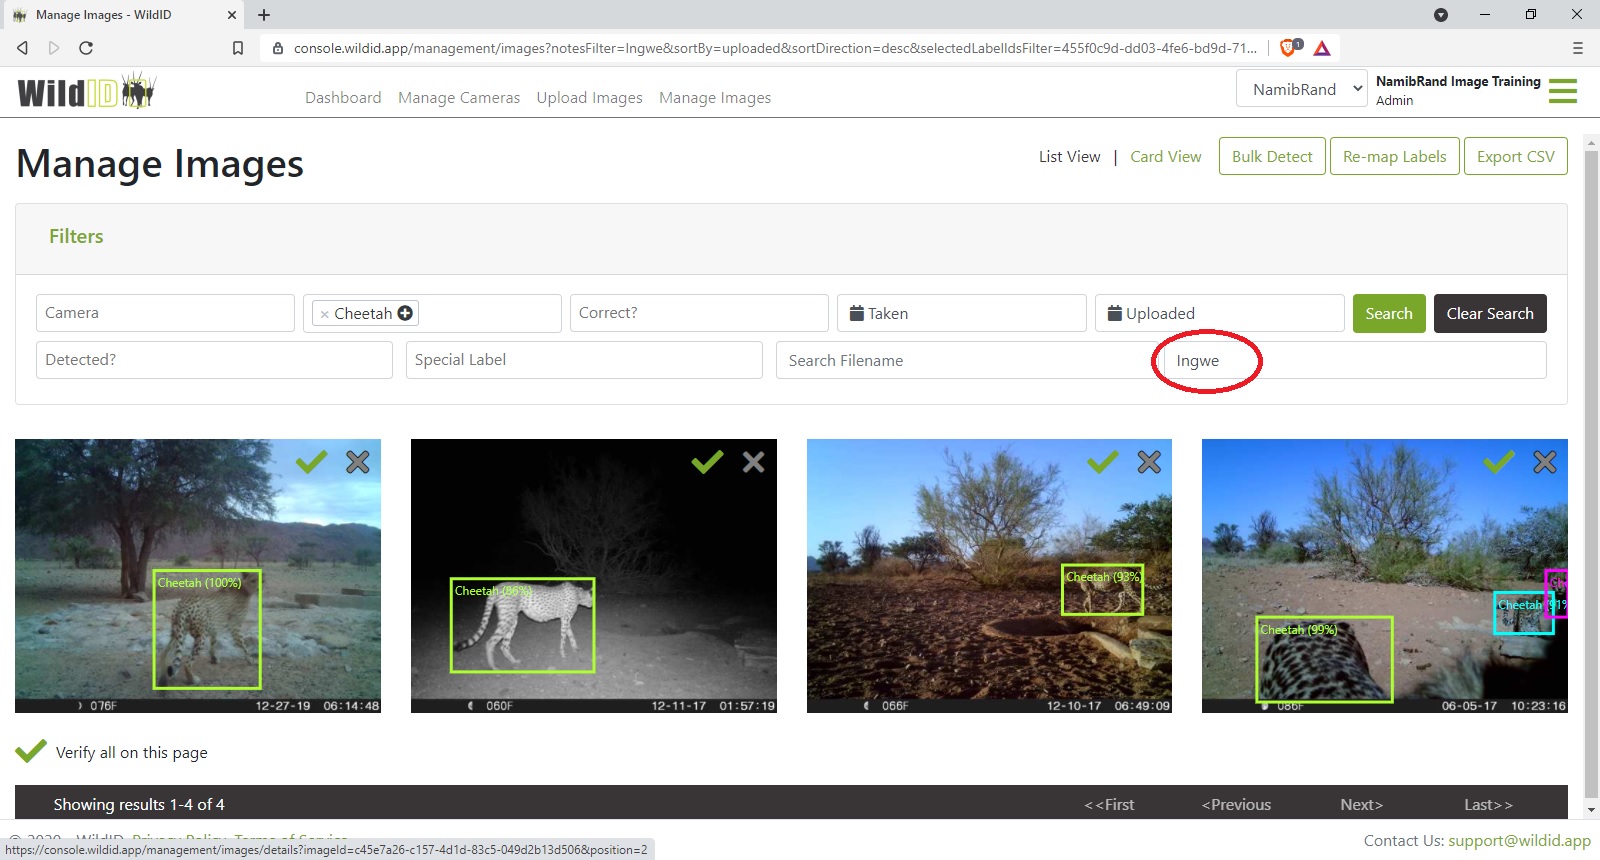
You can filter on Notes, to find (for example) all images of an individual animal (by searching for it by name), and notes are also included in the CSV data export.
Edit boxes
You can edit the size of a box when it has been drawn too large or too small on an animal, or move it if it is incorrectly placed.
To edit a box, first switch the Edit box mode to On using the toggle button above the image.
Once Edit box mode is on, click anywhere inside a box to edit it. Handles will appear around the box. Drag the handles to resize the box, or drag from inside the box to move it.

If you need to edit a second box, click inside that box to edit. Only one box at a time will be editable (have handles).

You can temporarily hide or show other boxes with the checkboxes in the details list if you need to see what you are editing more clearly.

When you have finished editing all boxes in the image, switch the Edit box mode to Off again. It will be off by default for each new image.
There is no save button for box edits. Your box edits will save automatically at the following points:
When you click onto a second box, edits for the first box will be saved
When you change the Edit box mode to off
Otherwise after 1.5 seconds if you do neither of the above actions
While you are editing boxes, the functionality to edit labels for those boxes is disabled. This is to avoid conflicts with editing the same record in two ways at the same time. When you switch Edit box mode off again you will be able to edit the labels as usual.
Add boxes
It is not possible right now to add a new box (when an animal has been completely missed in an image). This is on our roadmap.
For now, you can mark the image with the “Missing box” special label and come back to it when the functionality is available.
Filmstrip
The filmstrip allows you to view images taken at the same camera within 5 minutes before and after your current image. This feature can help you to identify difficult images.
By default, the filmstrip is switched off when you go to a new image in Image Details.
To view the filmstrip, first switch the Filmstrip mode to On using the toggle button above the image.
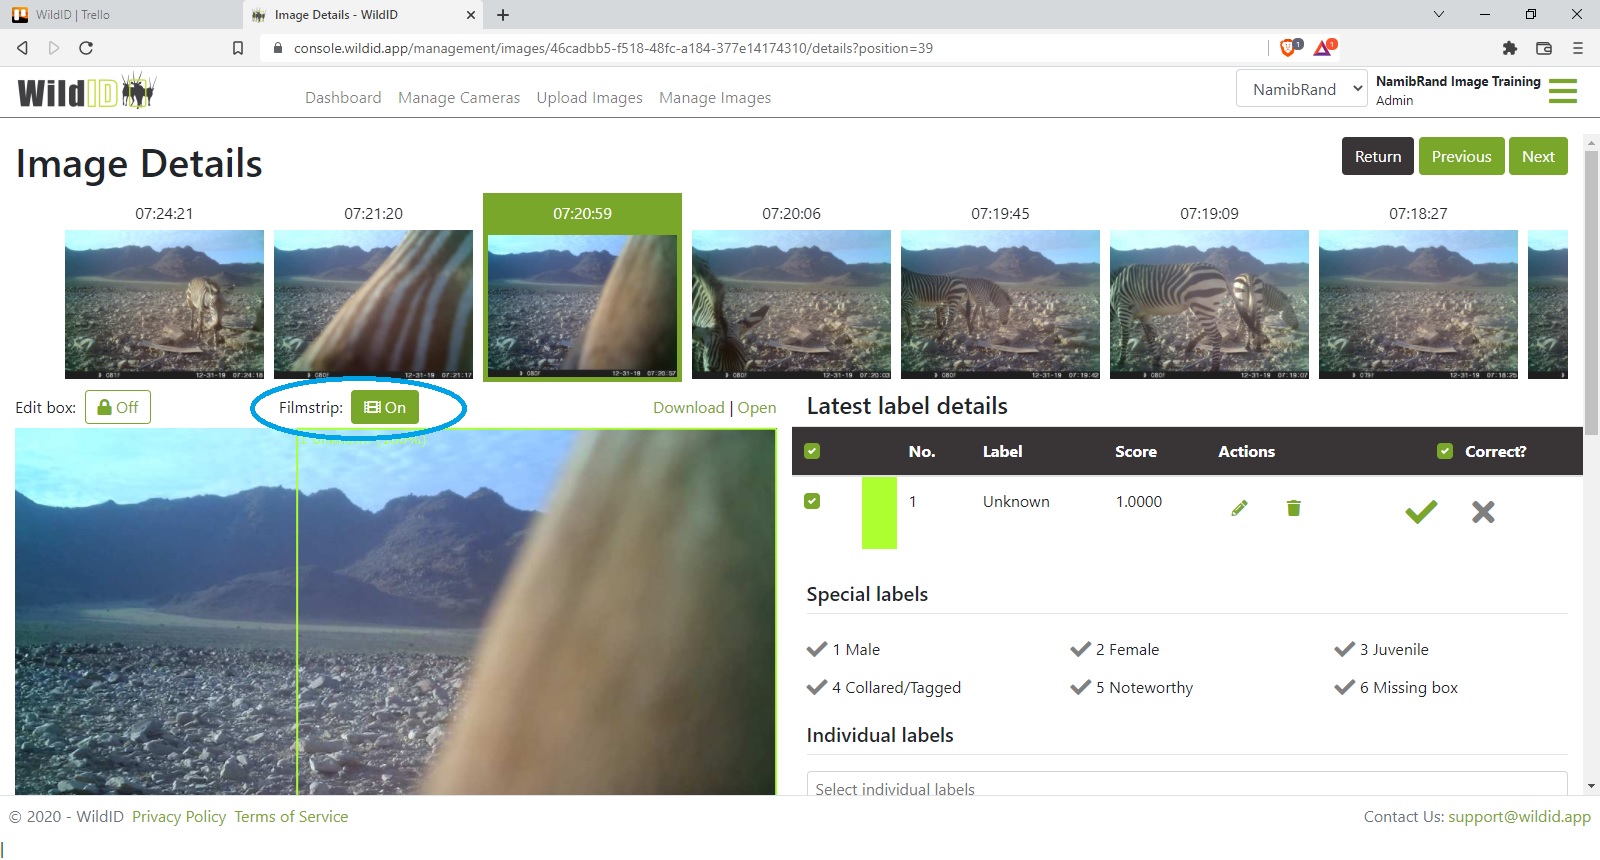
Your current image is shown, with a highlighted border around it, and its timestamp.
Any other images taken at the same camera within 5 minutes before (right) or after (left) are shown in the filmstrip.
Drag to the left and right to view additional images.