Storage
Storage relates to your entire organisation, and can only be accessed by Admin users.
This is where you can manage files that are stored on your behalf in the WildID storage system, including your uploaded images, and zip files you have created when re-exporting images from WildID.
Roadmap:
Currently the Storage functionality only relates to your Image export zip files. We will be adding functionality to monitor how much space your uploaded images are using, and to manage that space, if you are on a payment plan where storage space is a billing parameter.
Image exports
You are able to bulk export a selected set of images from WildID.
As part of this process, you can optionally request the EXIF data of the images to be updated with some of the data that has been added in WildID, including species and individual labels. You can also choose to export a PASCAL VOC data file for each image containing information about the bounding boxes and species labels in the image (for use in machine learning/model training software).
The files you have selected will be packaged into a zip file with folders for each camera’s images, and once complete, you will be notified to download the zip file.
How to export images
In the Manage Images page, search for the images you would like to export. This could be all the images for this organisation, images of a certain species or individual, or from a certain camera or date range. Bear in mind that all your selected images will be packaged into a single zip file, so if you have many images the zip file will be very large, and will require some time for WildID to build/package, and then for you to download.
Once your selected images have come back in the Search results, click the Export Images button. This is only visible to Admin users.
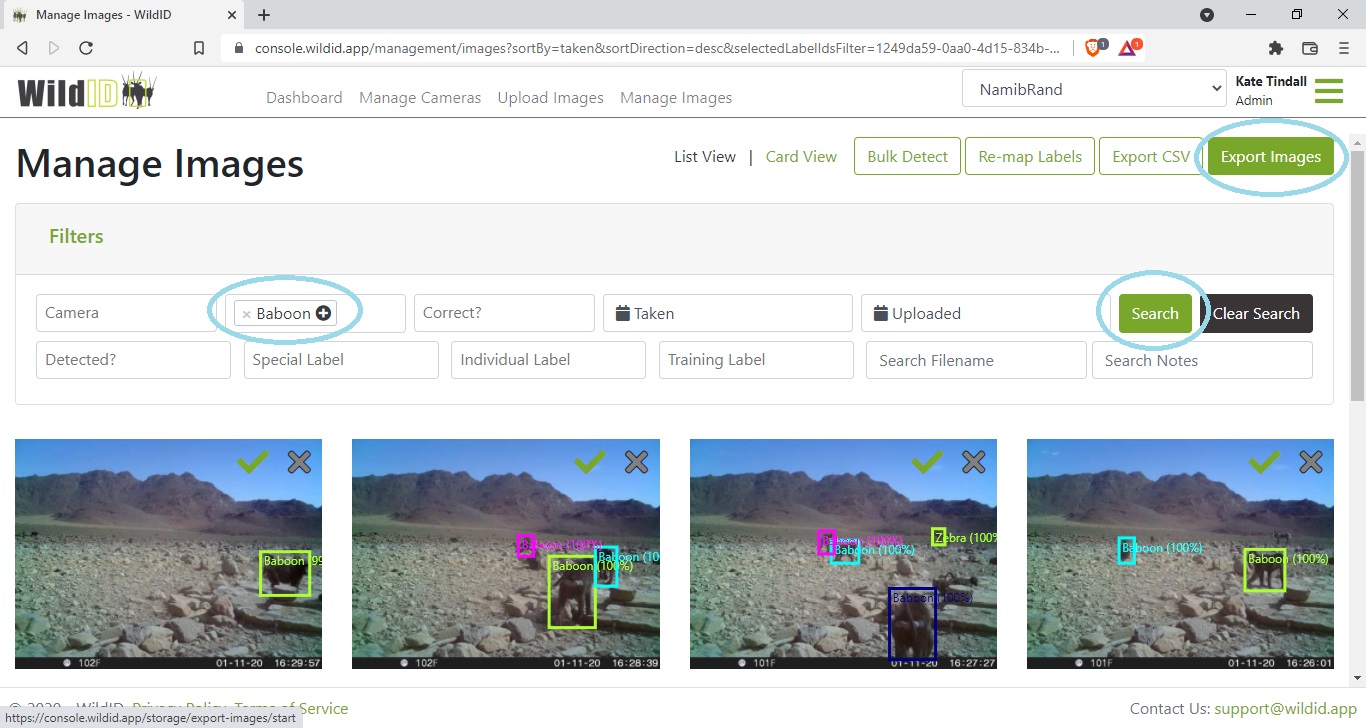
You will be taken to the Start Image Export screen, where the number of images you have selected for export will be listed.
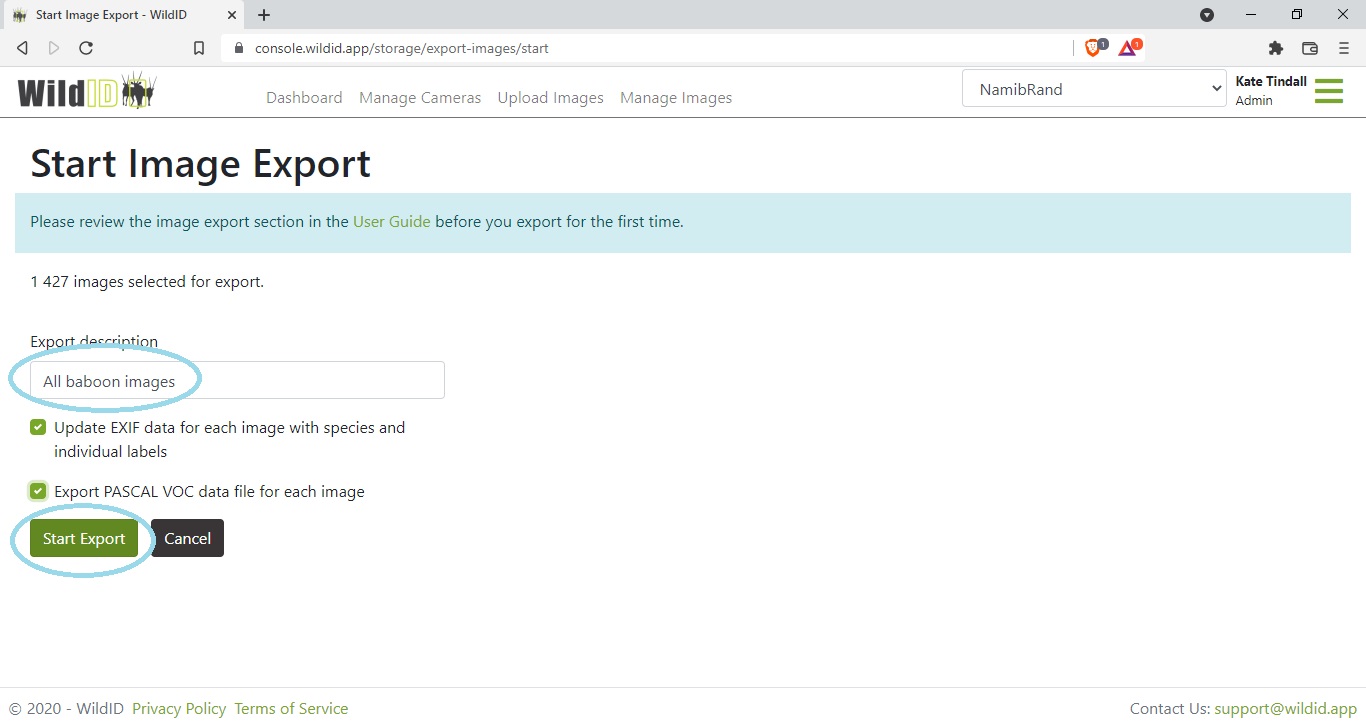
Enter a descriptive name for your export session - you can use this later to find your file in the list of export files available for download.
Check the checkboxes to indicate whether you would like the EXIF data of each of your images to be updated, and whether you would like a PASCAL VOC data file included alongside each image.
See also Update EXIF data for more on EXIF data updates.
See also Export PASCAL VOC data for more on PASCAL VOC file export.
Click the Start Export button.
WildID will queue your images for export, and begin packaging them into a zip file for you.
See also Export file format for information on how the zip file is structured.
You will be notified by email once your export file is ready for download.
You can also manage the progress of your export on the Storage, Image Exports page, which is also where you will download the finished file from.
See also Manage image exports for how to manage image exports.
Note that your original images will remain in WildID, and copies are exported.
Only one export session per organisation can be in progress at one time. If an export session for your organisation is already in progress, you will be notified of this fact when you try to start a new export. Wait till the current export is complete, and then start the new one.
Update EXIF data
When you choose to export a set of images, WildID will ask you whether you would like to update the EXIF data of the images as you export them.
EXIF (exchangeable image file format) data is metadata about an image that is stored within the image file in a common way for use by various image editing software. It typically includes data such as the date and time at which the image was taken, the camera make and model, the F-stop, possibly the GPS co-ordinates. It also includes the actual image itself, as well as thumbnails for preview.
Some EXIF data is visible if you view the file properties of a file on your computer, and it is also available for use by EXIF readers and various image processing software packages.
If you choose to update the EXIF data of your images on export, WildID will write in the following data:
species labels
individual labels
Species labels
A list of any labels added to the image that are:
not deleted, and
unverified (WildID detected the label but you have not marked it as correct or incorrect yet, it is still “unknown”), or
verified as correct by you
labels marked as incorrect will not be included
Individual labels
A list of all individual labels that you have added to the image.
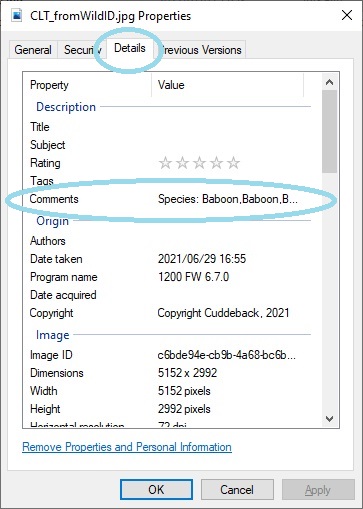
The data is placed in the Exif.Photo.UserComment field, which is tag 0x9286 (hex) or 37510 (dec).
If both sets of data exist, the format would look something like this:
Species:Baboon,Baboon,Baboon Individuals:F1,M2,M5
If there was already previously data in the UserComment field, we will prepend the WildID data to it (put the WildID data first, and retain the old data after it).
If you view the file properties in Windows you would see something like this:
Roadmap:
We will be writing into more EXIF fields over time, and would like at some point to give you the ability to choose which data you would like to include (for example organisation name, camera name/location, notes), and possibly which EXIF fields you would like it written into.
Export PASCAL VOC data
PASCAL VOC (Visual Object Classes) is an XML format that can be used after conversion for training models. It includes data on objects found in the image, where their bounding boxes are, and what classes (species) they belong to.
The data for an image as exported from WildID looks like this:
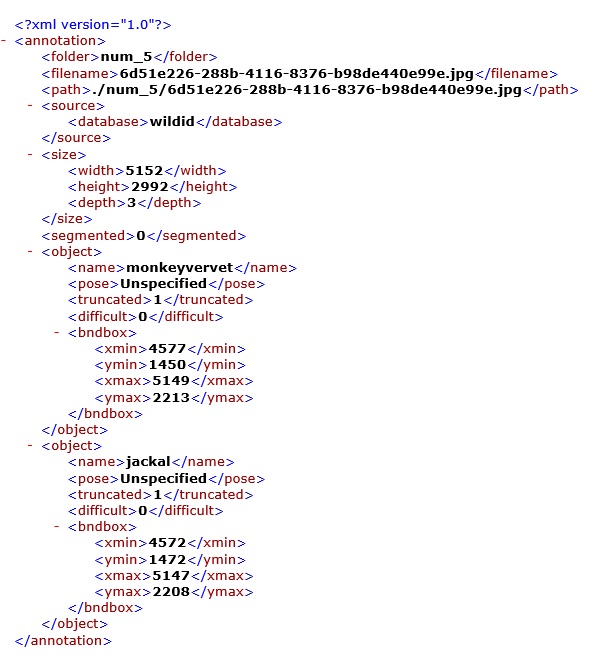
If you select the option to export PASCAL VOC files, an xml file for each image will be added to your zip file.
Manage image exports
You can manage your image exports in the Image exports tab of the Storage section.
Here you can find a list of all exports, download them, and delete them. You can also cancel an export that is in progress.
View:
As your image export session starts, you will be directed to the Image Exports screen to monitor your download. You can also get to this screen at any time from the Storage menu.
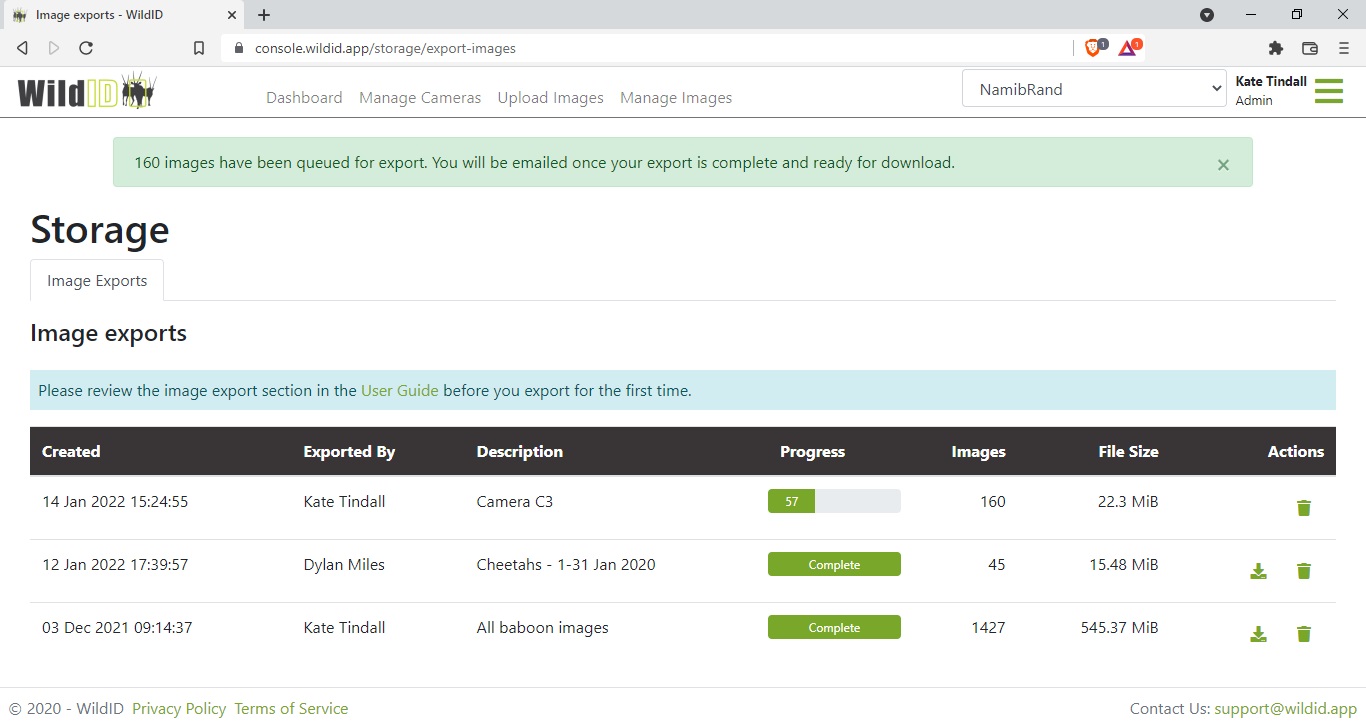
All export sessions started by any admin user in your organisation will be listed here, most recent on top.
While the zip file is still being built, the progress bar will show you the number of images packaged so far, and the filesize will kepp updating to the current filesize.
Once the zip file is complete, the progress bar will show complete, and only at this point can the file be downloaded.
Export file sessions will be listed in the Image exports screen until or unless you choose to delete them.
Download:
Once your export file is ready, WildID will send you an email to inform you you can download, with a link to the Image exports screen.
The link will only work for Admin users who have rights in your organisation, so bear this in mind if you forward the email to someone else.
There is no time limit to when you can download from the Image exports screen.
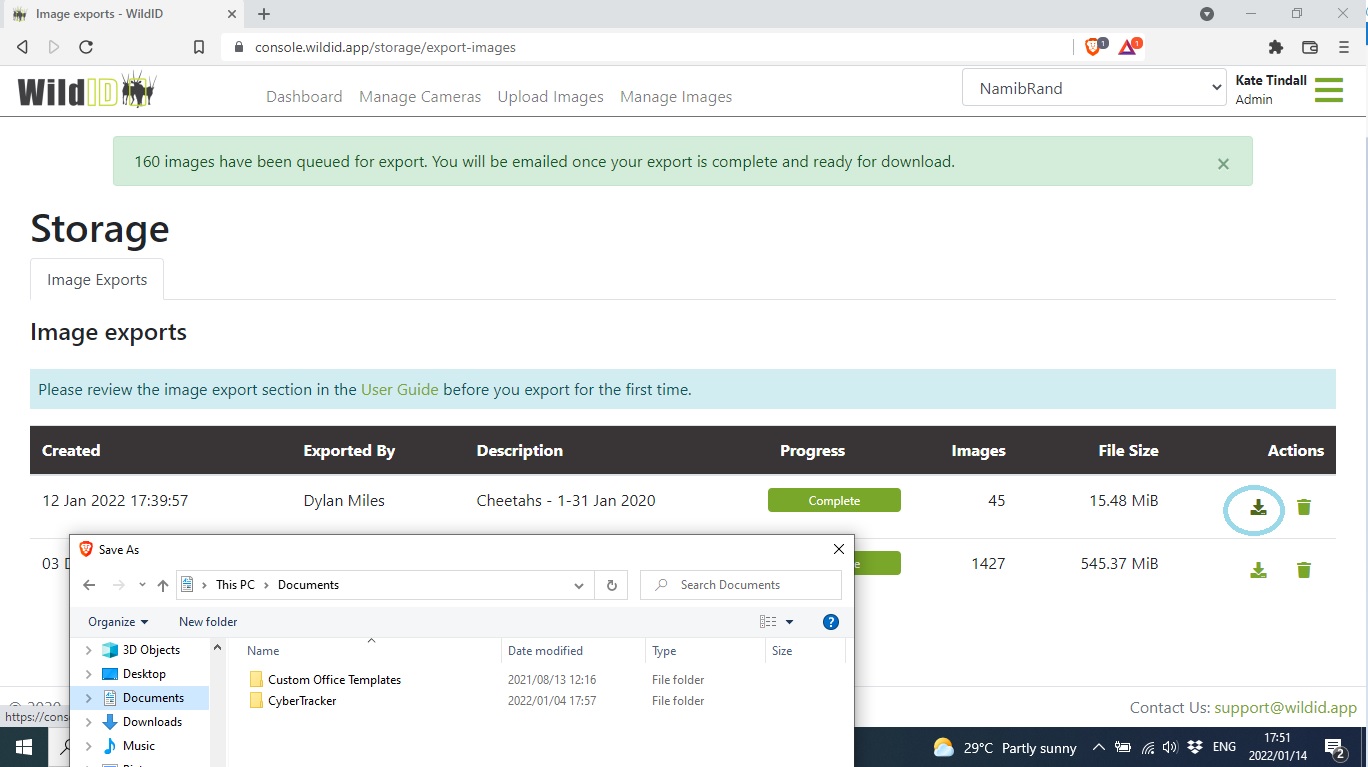
In the Image exports screen, click on the download icon to download, and choose a location on your computer to download the file to when prompted.
Cancel or Delete:
If the image export is still in progress, you can cancel it by clicking the bin icon, and confirming your cancellation.
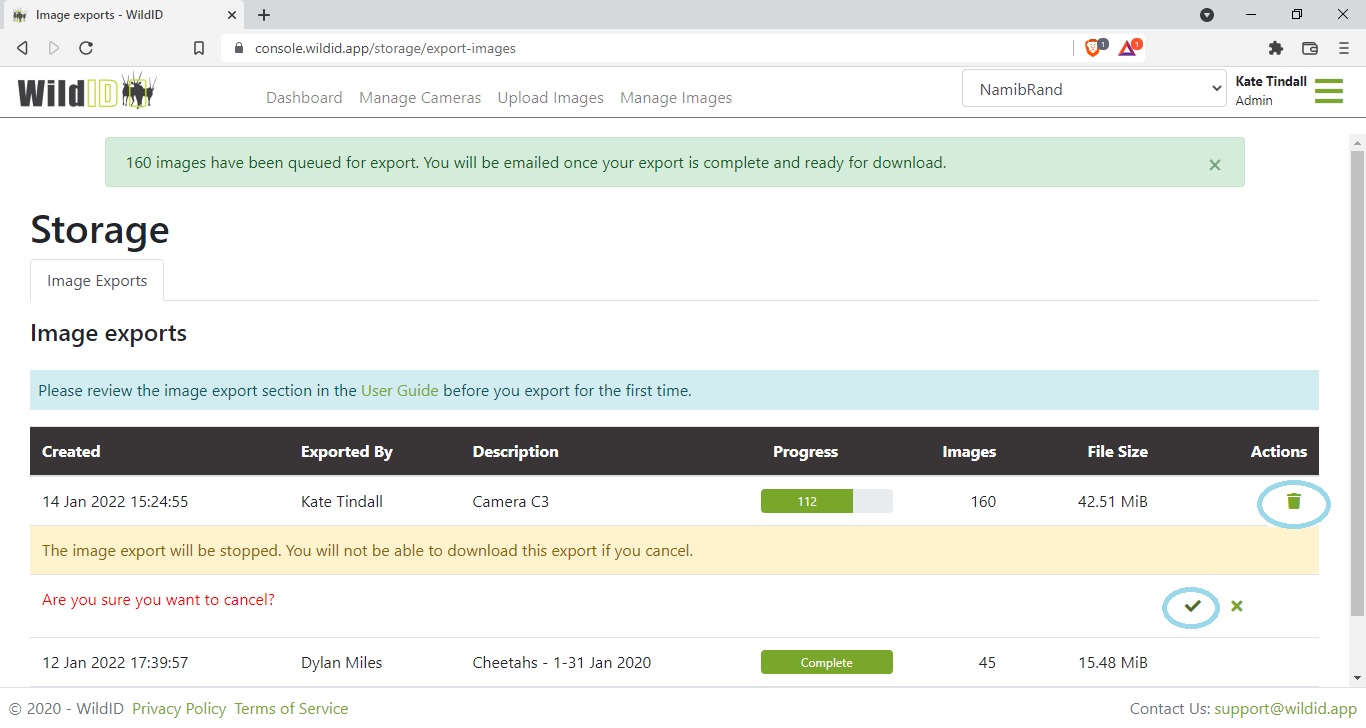
You will not be able to download the zip file, and the session will not appear in the list any longer.
If the image export is complete, and you have already downloaded the file, you can delete the file by clicking on the bin icon, and confirming your deletion.
The zip file will be deleted from your WildID storage area, and the session will not appear in the list any longer.
Export file format
Exported image files are packaged into a single zip file.
The filename is
WildID_ImageExport_{Organisation-Name}_{yyyy-mm-dd_hh-mm-ss}.zip
For example
WildID_ImageExport_NamibRand-Nature-Reserve_2022-01-07_10-06-23.zip
Your organisation name will have any spaces in it replaced with hyphens
The date and time is the time at which the image export session was started (not completed), in UTC (GMT).
Inside the zip file will be a folder for each camera for which you exported images. If you only exported images from one camera, there will be only one folder. The folders will be named with the camera name, where any spaces will be replaced with hyphens.
Inside each folder, the images for that camera will be placed using their original filenames (as per when you uploaded them to WildID).
The images will be the original size which you uploaded.
The boxes and labels added by WildID will not be visible on the image.
It is possible in WildID to upload two images with the same filename to the same camera, as long as the date on which the image was taken differs between the images.
So for example you might have an image called HUNT4401.JPG for Camera 1 taken in January 2020, and a second image for Camera 1 also named HUNT4401.JPG taken in February 2020.
Because we will put both these images into the Camera 1 folder in the zip file, when you extract them to your computer the second file will overwrite the first if it has the same filename.
If we find a duplicate filename for the same camera in your selected images, we will rename the second (and subsequent) files so that you will get:
HUNT4401.JPG
HUNT4401_2.JPG
HUNT4401_3.JPG
If you chose to export PASCAL VOC files as well, they will be similarly renamed:
HUNT4401.JPG
HUNT4401.XML
HUNT4401_2.JPG
HUNT4401_2.XML
HUNT4401_3.JPG
HUNT4401_3.XML
Roadmap:
We will add features in the future to allow you to choose the size at which you would like to export images, and also to delete the original images from WildID after export (while still retaining the data, ability to filter, and thumbnails).