Manage Images
Most of your work with your camera trap photographs will take place on the Manage Images page. This is where you’ll search and view your images, edit and export your data.
Card view
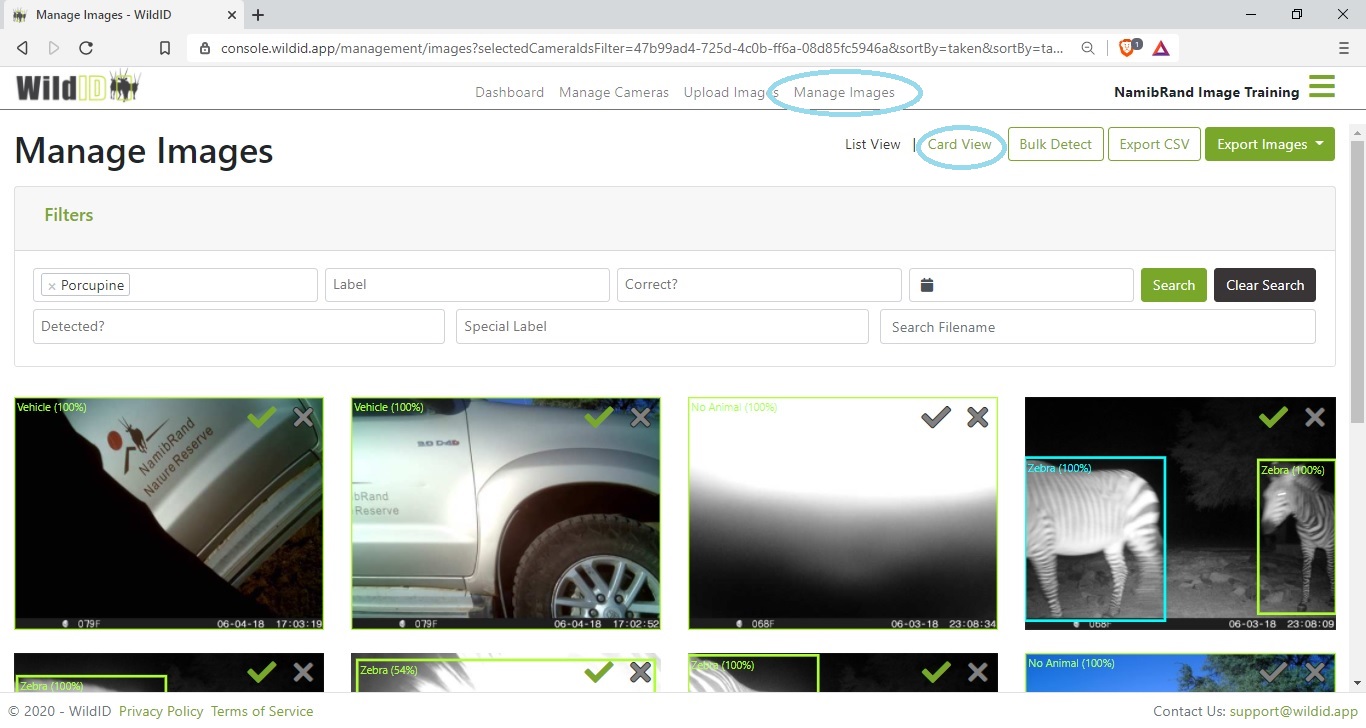
Displays 12 images at a time as cards.
Images shown will match any filter criteria entered (defaults to all images from your organization).
Image order will match last sort order (defaults to date taken with most recent first).
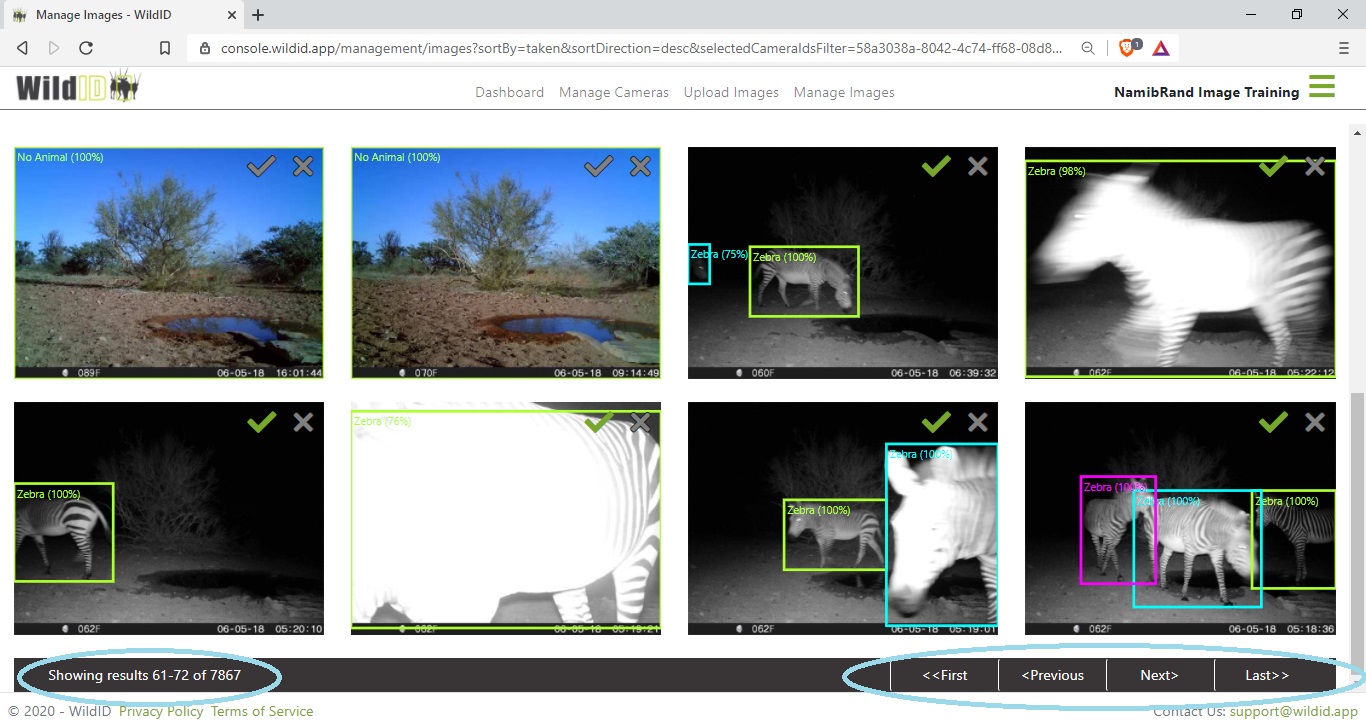
Navigate to the next 12 images using the navigation bar at the bottom.
Verify all labels in an image from Card view
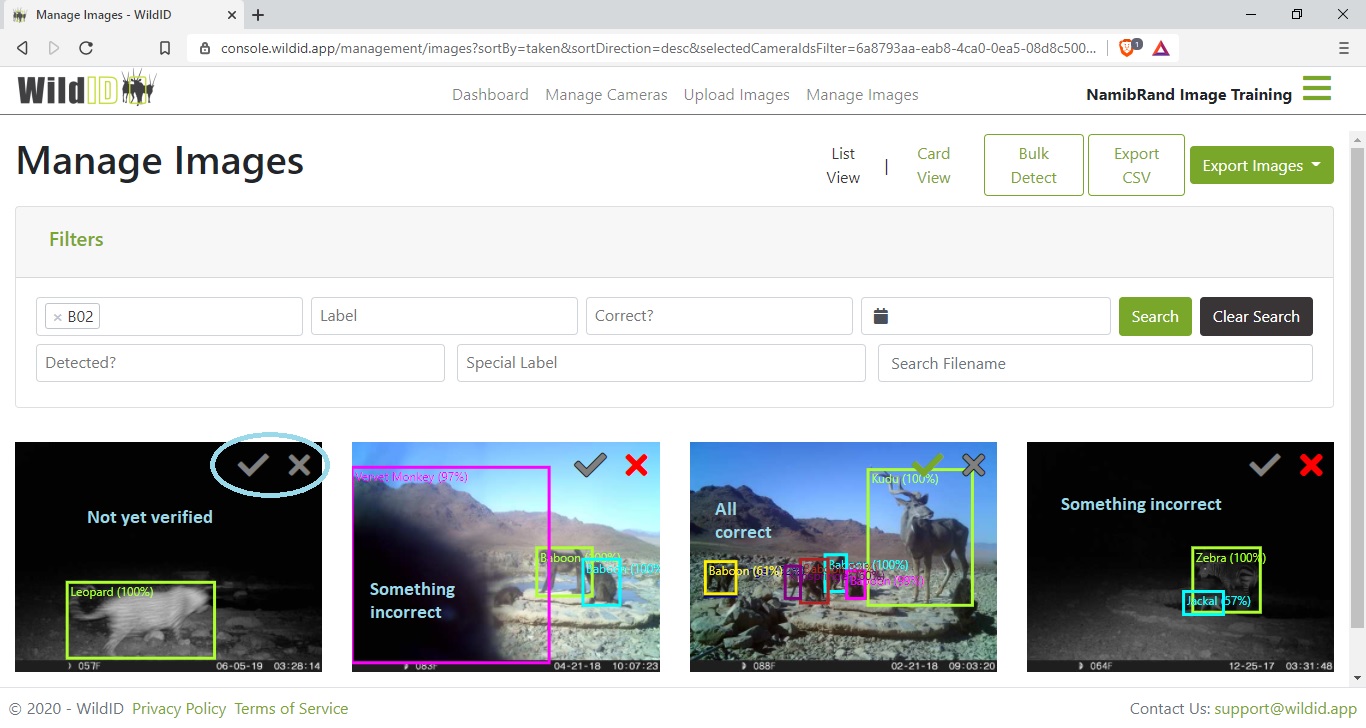
The Card view shows a tick and a cross icon at the top of each image that has been detected. You can use this to verify the detections and identifications as correct or incorrect.
Seeing what the current status is
If nothing has yet been selected, the icons are both grey.
If ALL labels in an image have been verified as correct, the image as a whole will show a green tick.
If even ONE label in an image has been marked as incorrect, the image as a whole will show a red cross.
Setting the status
If you select the green tick, you will verify ALL labels in the image as correct.
If you select the red cross, you will verify ALL labels in the image as incorrect.
If you deselect the tick or the cross, you will clear the ticks or crosses from ALL labels in the image.
Only use the card view to verify labels if you can see clearly from the image that all labels are correct, there are no boxes you would like to delete, and you can read all labels clearly and see the animals.
If you cannot see all details clearly, it is better to click on the image to go into Image Details and do the verification per label there, with a larger and clearer image.
See also Verify labels.
Verify all cards on this page
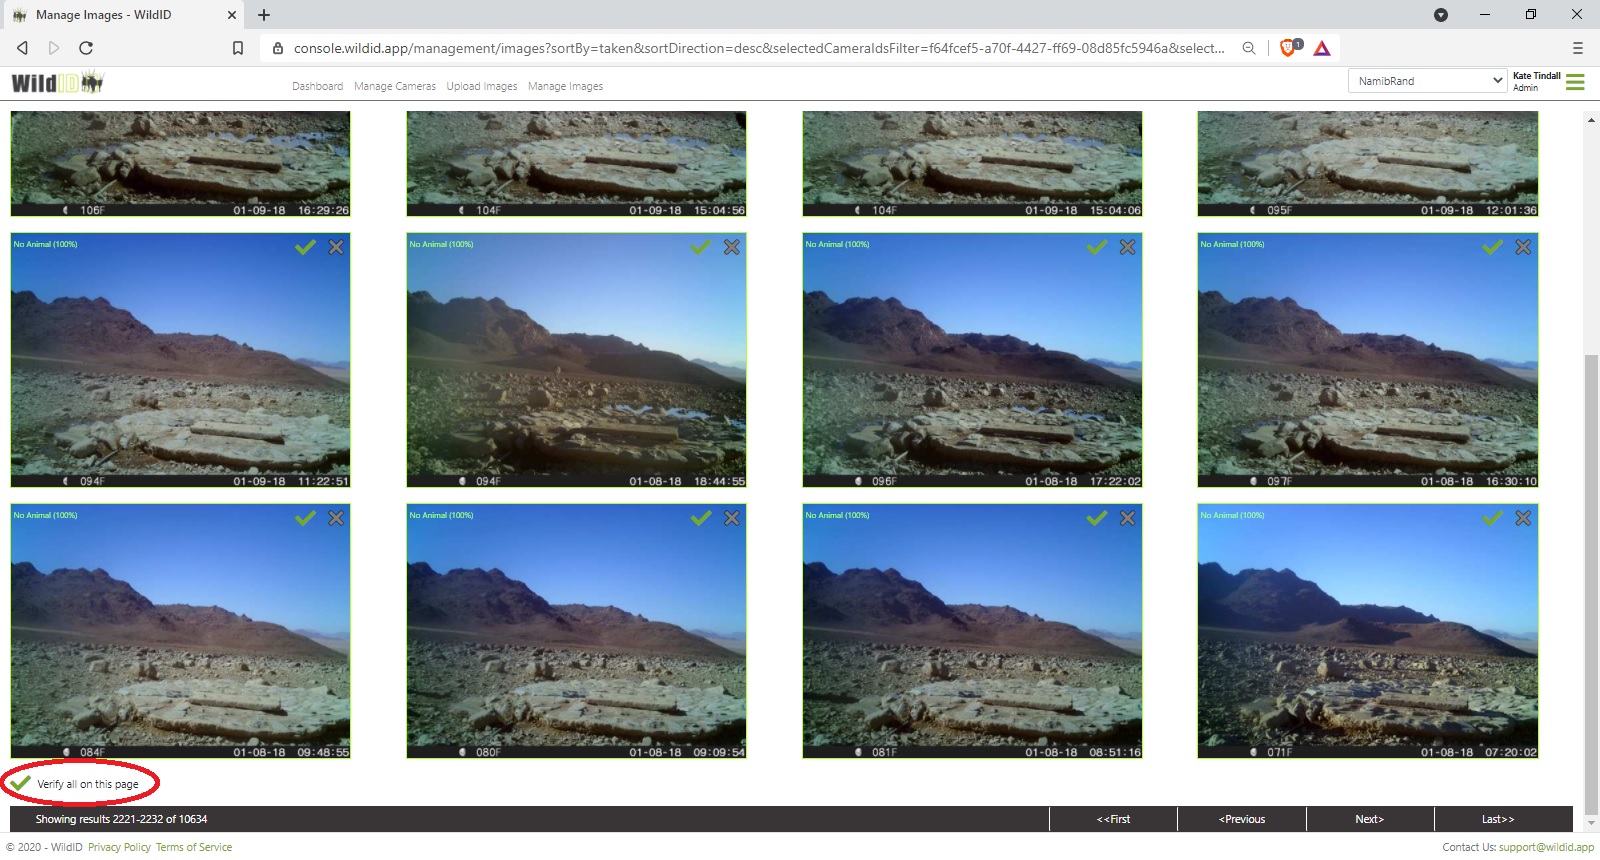
If you are sure that all labels in all 12 images on the page are correct, use the “Verify all on this page” icon at the bottom left of the screen.
This feature is especially useful for double-checking “No Animal” images and verifying them quickly, ticking a full page of search results in one go.
List view
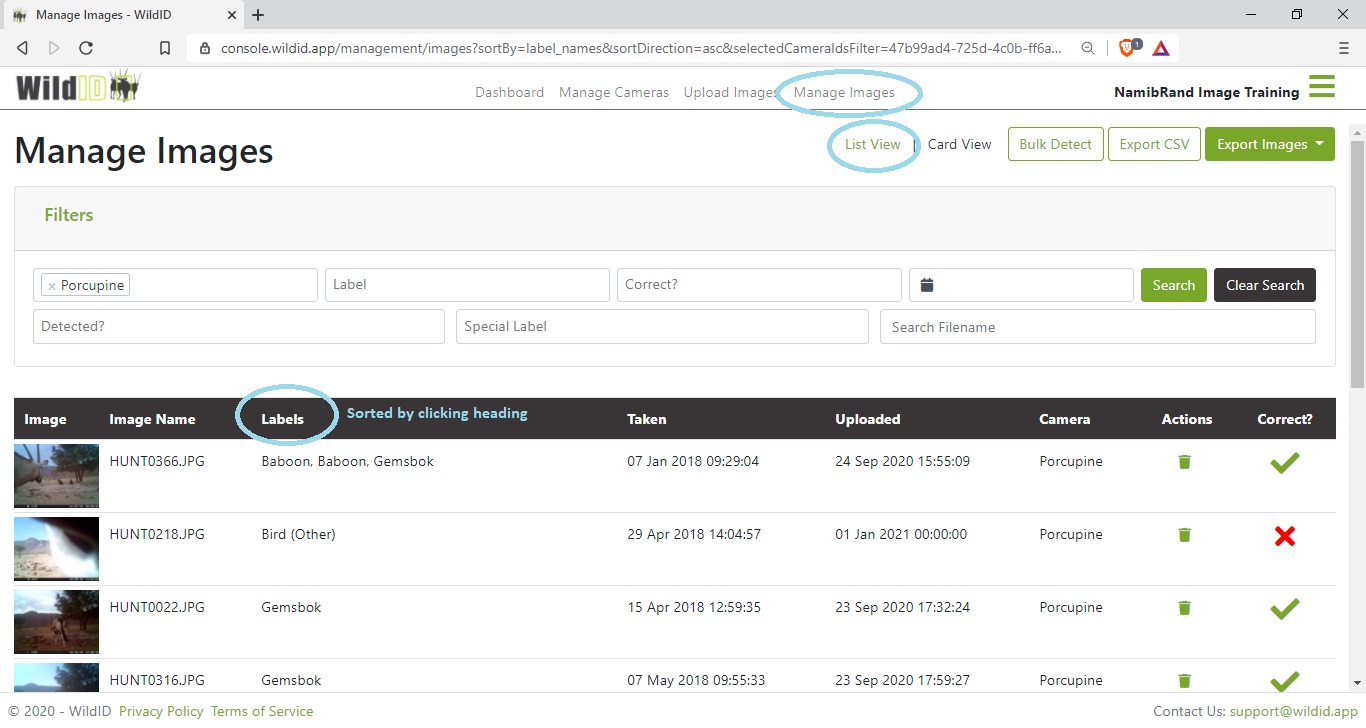
Displays 12 images at a time as in a table.
Images shown will match any filter criteria entered (defaults to all images from your organization).
Image order defaults to date taken, most recent on top.
Navigate to the next 12 images using the navigation bar at the bottom.
Correct? indicators
The List view shows a green tick or red cross icon or indicator for images that you have verified.
If ALL labels in an image have been verified as correct, the image as a whole will show a green tick.
If even ONE label in an image has been marked as incorrect, the image as a whole will show a red cross.
You cannot verify images from the List view (the indicators are not editable), but you can verify images from the Card view.
See also Verify labels.
Sort image list
Change the sort order by clicking on a column heading.
For example, to sort by Image Name, click the Image Name column heading.
Click a second time to reverse the sort order (toggles between ascending and descending sort order).
Delete image
Individual images can be deleted using the bin icon in the Manage Images List view.
Images cannot be retrieved once deleted.
Detect image
Individual images can be detected using the eye icon in Manage Images List view.
See also Detect Images.
Filter and Search images
You can filter your list of images by various filters.
You can change the filters and search in both List and Card views.
Available filters
Most of the filters have dropdown options from which you can select multiple items.
Start typing in the filter box to see a list of matching options.
Camera
Brings back all images uploaded to selected camera/s.
Available before image has been detected.
Label
Brings back all images containing animals with selected species name/s.
Based on latest label results for image, be that from model detection or where you have changed the label to a different species.
Only available after image has been detected.
Correct?
Correct – image or label has been verified by you as correct.
Incorrect – image or label has been verified by you as not correct.
Unknown – image or label has not been verified by you yet.
Only available after image has been detected.
Date taken range
Brings back all images taken between the specified date range.
Start and end date are included.
Available before image has been detected.
Date uploaded range
Brings back all images uploaded between the specified date range.
Start and end date are included.
Available before image has been detected.
Detected?
Yes – image has already been detected
No – image has not yet been detected; may not yet have been submitted, or may be queued or busy.
Available before image has been detected.
Special label
Brings back all images tagged by you with selected special label.
Available before image has been detected (as long as special label has been marked in image).
Individual label
Brings back all images tagged by you with selected individual label.
Available before image has been detected (as long as individual label has been marked in image).
Filename
Type in a full or partial filename.
Available before image has been detected.
Notes
Brings back all images containing your search keyword/s in the Notes field.
Matches are on full words only, exact matches. All search keywords need to be present in the Notes to be returned. For example, if you search for “Ingwe female”, both words need to be present in the Notes for an image to be returned - it will not return images where only the word “female” is present (nor will it return “females”).
Available before image has been detected (as long as Notes have been saved for image).
Label Counts
Brings back images with the number of labels (boxes, or detected animals) matching your specification.
Choose between:
One label only
Up to two labels
Up to three labels
You can use this filter to move very quickly through large numbers of images to verify them in card view. It is much easier to verify images with one label (box/animal) only in them, whereas images with multiple labels/objects often need to be checked in more detail.
Roadmap:
Additional filters, such as time of day (day/night), will be added over time or as requested by you.
Combining filters: ands and ors
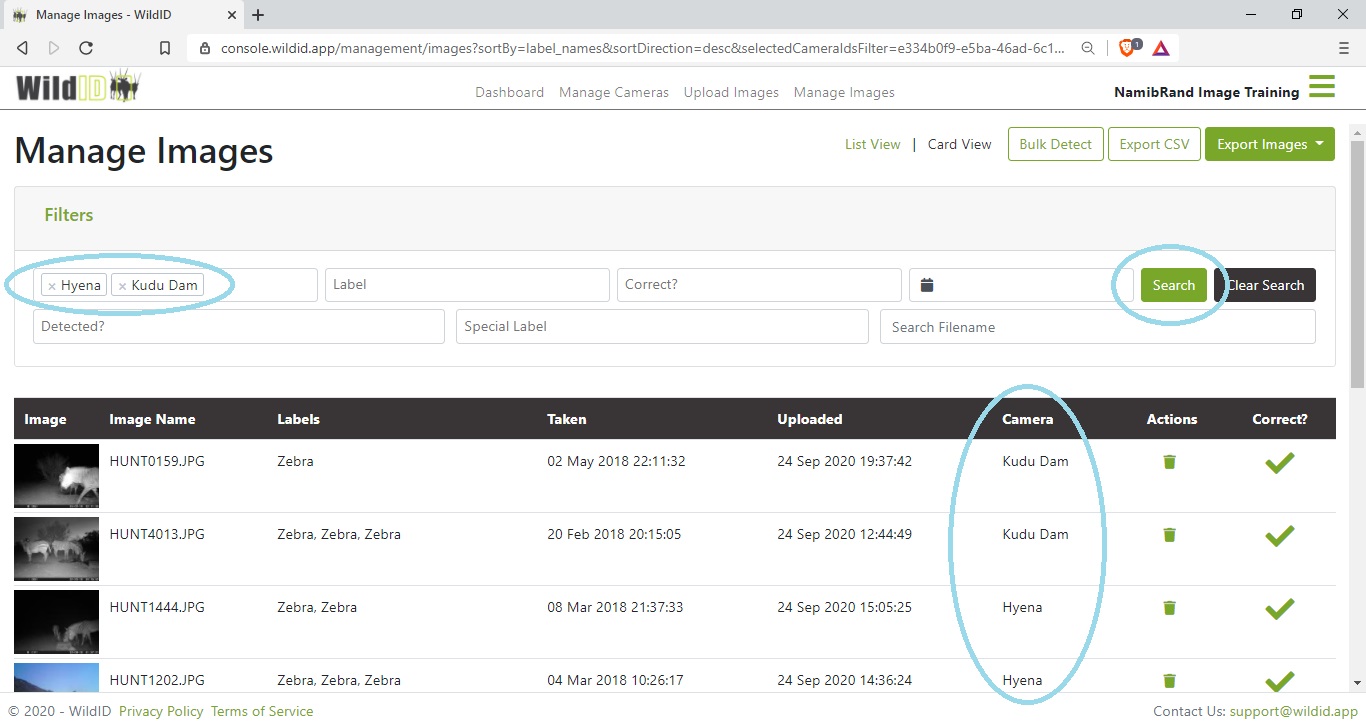
Within one filter type, if you make more than one selection, you are asking for any images that match A OR B.
For example, if I enter Hyena and Kudu Dam in the camera filter, I will get all images from either the Hyena OR Kudu Dam cameras.
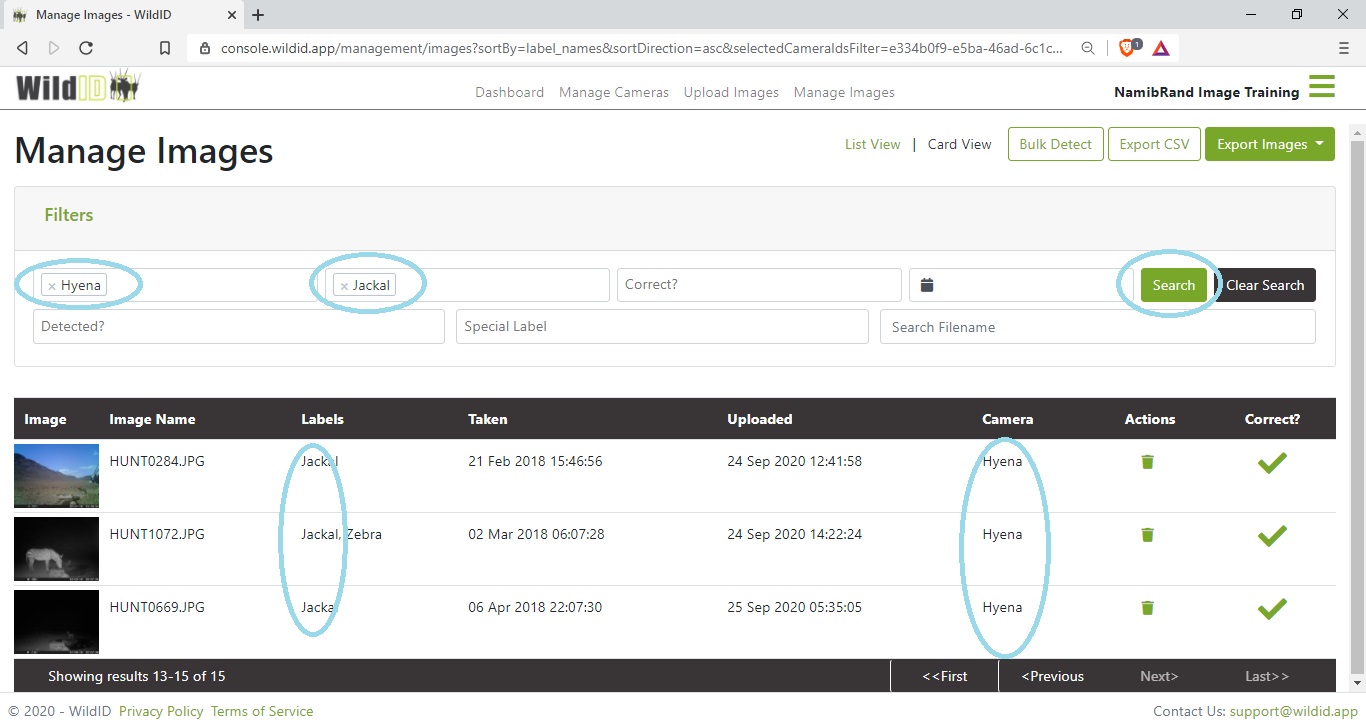
When you use two different filter types, you are asking for any images that match A AND B.
For example, if I ask for camera = Hyena, and species = Jackal, I will get images of jackals AND that were also from the camera :”Hyena”.
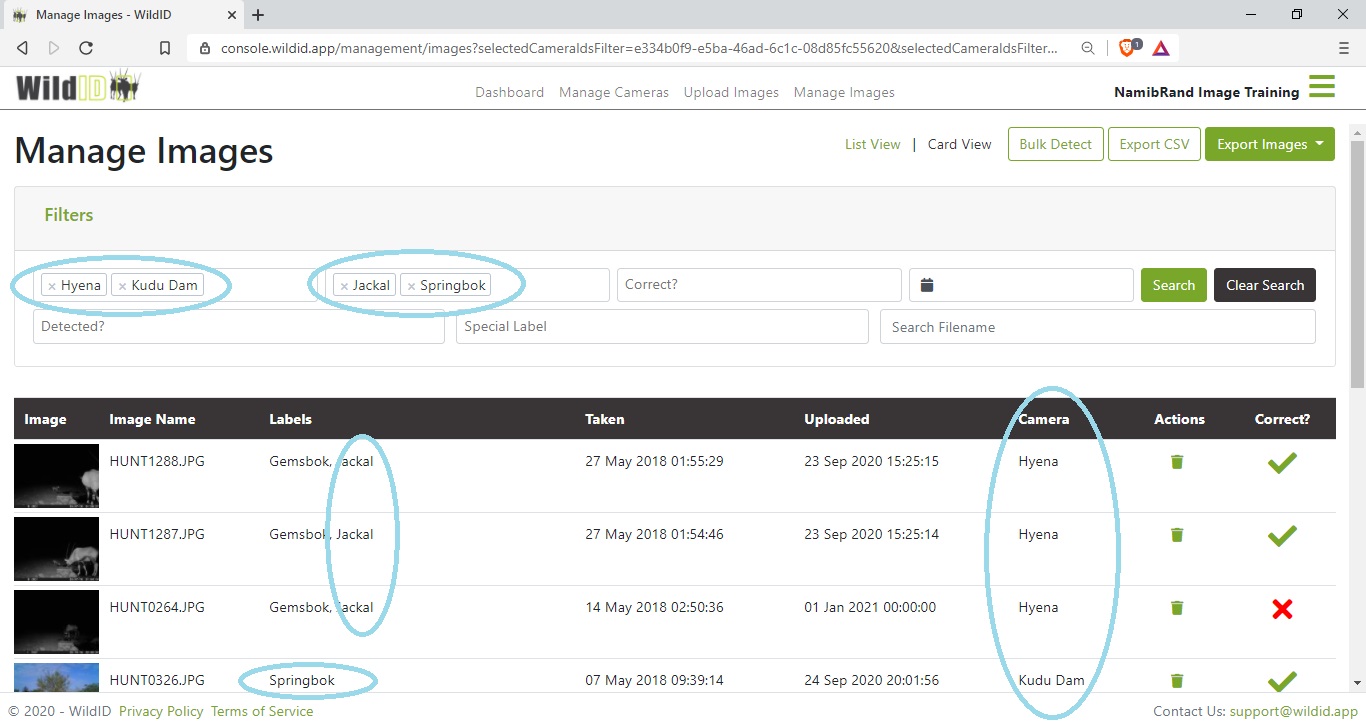
If I choose
(Camera = Hyena OR Kudu Dam)
AND
(Species = Jackal OR Springbok)
The results can match either of the cameras, and either of the species.
Include and Exclude filters
By default, the filters are INCLUDE filters. This means for example you want to include all images with special label Juvenile.
Include is shown with a plus icon.
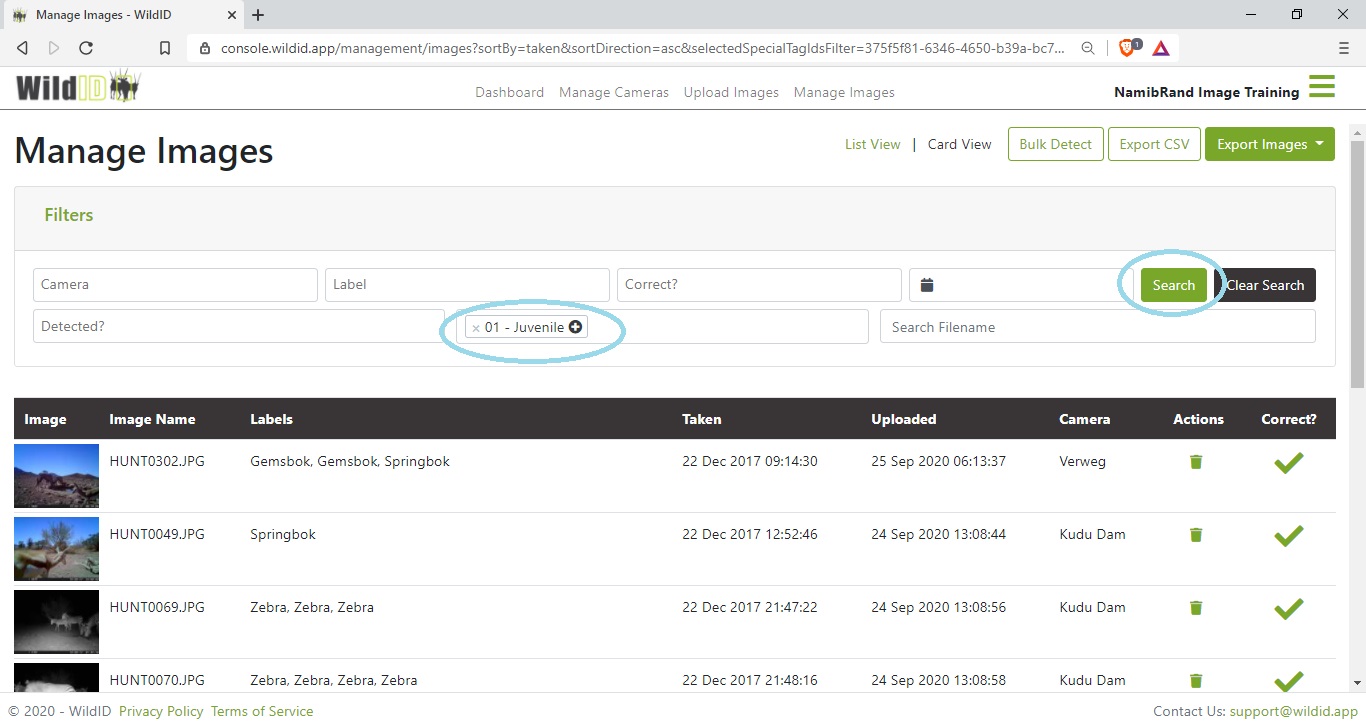
Clicking on the filter will toggle it to be an EXCLUDE filter. This means you would like to for example EXLUDE all images with special label Missing box, but bring back all other images.
Exclude is shown with a no entry icon. Click again to toggle back to include.
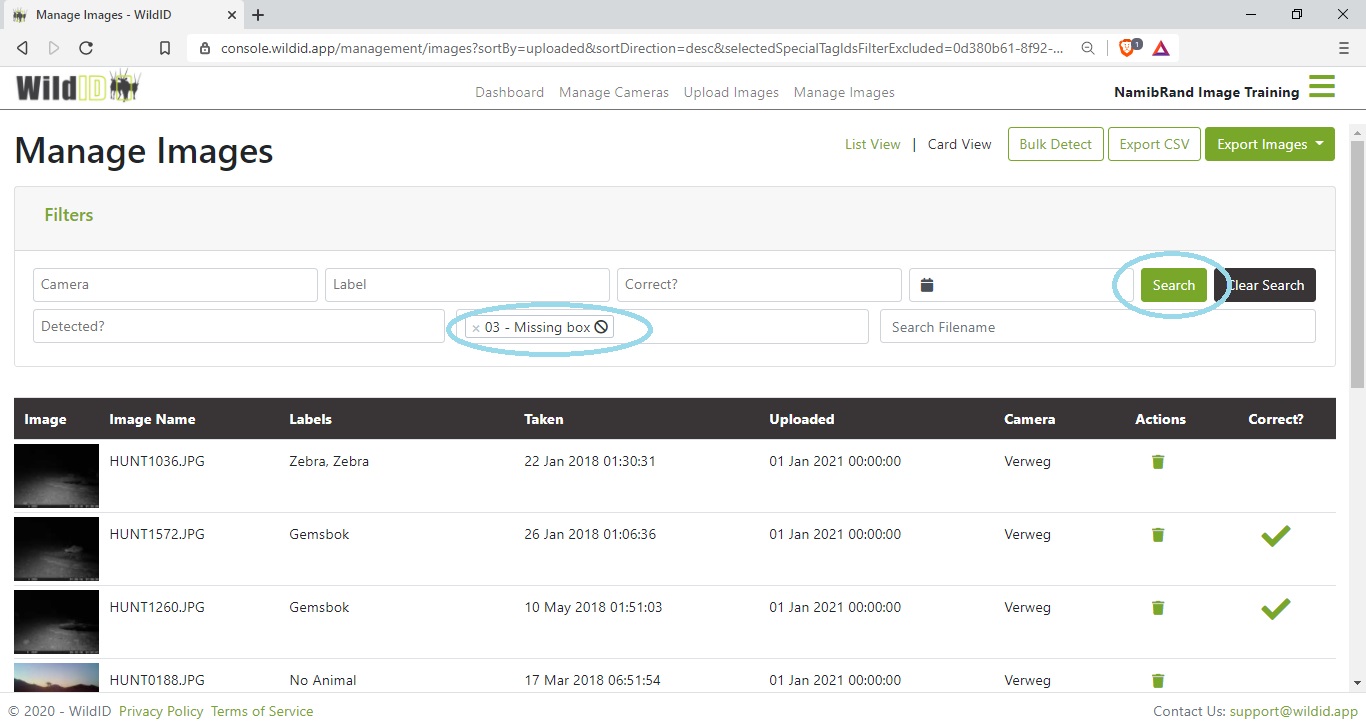
Include and exclude functionality is available on the Camera, Label and Special Label filters.
Export CSV
Once you have filtered on a set of images in the Manage Images list, you can export your data to CSV.
The CSV contains one record or row per object/animal, in other words there could be multiple rows per image.
The CSV data may then be used to create a pivot table for counts per camera, species, time period and so on, or to prepare files for import into analysis or mapping software.
The following data is contained in the CSV export:
As soon as the file has been uploaded (even before detection):
Image name – your original filename
Camera – camera name to which the image was uploaded/at which the image was taken
Camera description
Latitude/Longitude – GPS co-ordinates of the camera as defined in WildID, not taken from the exif data in the image
Taken – date on which the image was taken, from the exif data of the image
Uploaded – date on which the image was uploaded to WildID
After detection:
Labels – latest label details, whether from WildID model detection, or whether edited by you. One animal per row.
Percentage – the prediction score – how sure WildID was about the species prediction; will be 100% if you have edited or verified the label.
After verification or addition of special labels, individual labels or notes:
Correct? – Correct or incorrect if you have verified the label as such, or Unknown if the object has been detected but not yet verified by you.
Special labels – a comma delimited set of all special labels assigned to the image by you. Note that special labels are assigned per image, not per object, so they will be repeated for every label record from the same image.
Indivdual labels – a comma delimited set of all individual labels assigned to the image by you. Note that individual labels are assigned per image, not per object, so they will be repeated for every label record from the same image.
Notes - the text of your notes for the image. Notes are assigned per image, not per object, so they will be repeated for every label record from the same image.
Roadmap:
We will be increasing the reporting capability in WildID itself, and would like to hear from users on their specific reporting requirements, as well as what additional data export formats would be useful.
Re-map labels
The Re-map labels function can be accessed via the button on the Manage Images page, and also from the Label Mappings tab on the Settings page.
See also Label mappings.
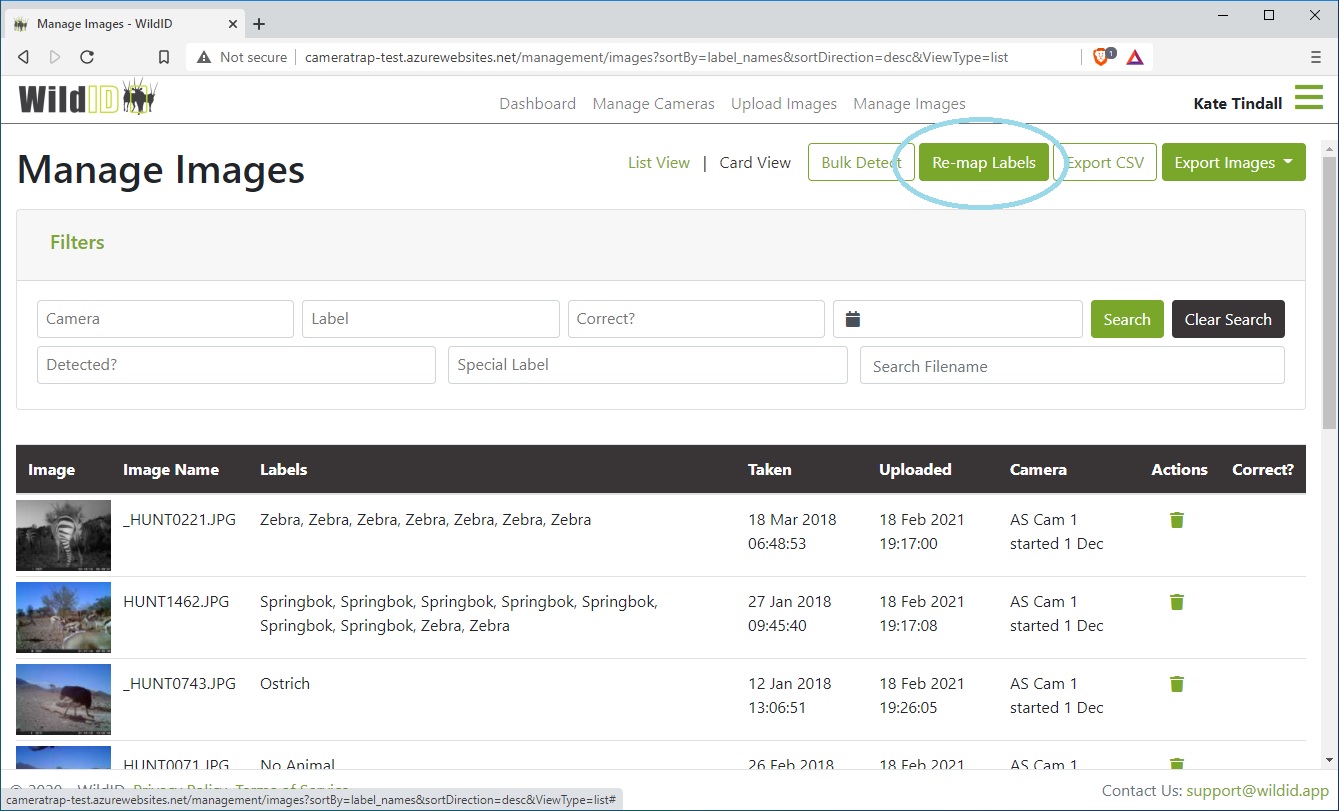
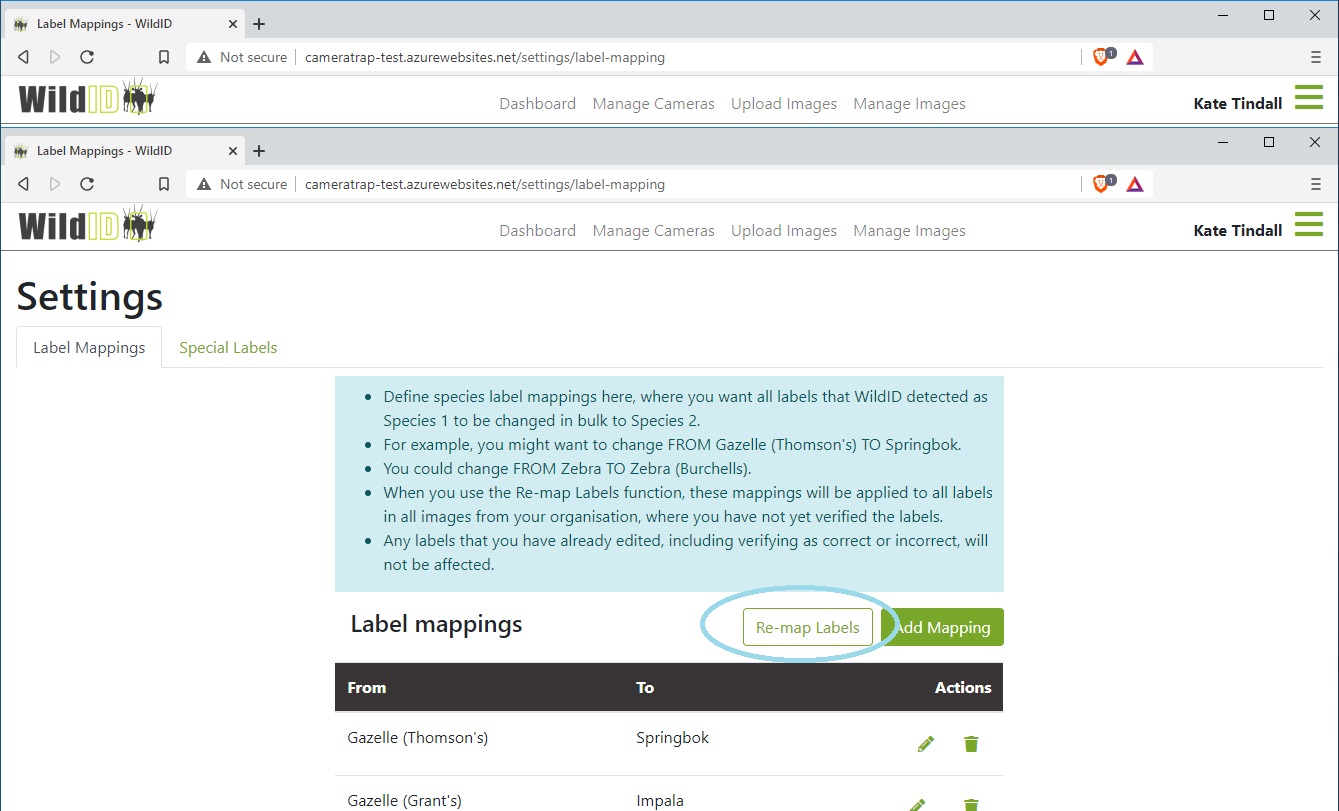
Creating Label mappings in Settings means that you are telling WildID that when you Re-map, you would like all labels that were detected as Species 1 to be changed FROM Species 1 TO Species 2.
For example, you can add a mapping to change FROM Striped Hyena TO Aardwolf if you only (or mostly) have Aardwolf in your area, and are getting some misclassifications.
When you have set up the Label mappings once, you can perform the change at any point by using the Re-map labels button.
Which labels in which images are affected?
WildID will not automatically re-map labels for you for each detection. Even if you have Label mappings set up, you will have to click on the Re-map labels button each time you want to re-map labels, so that you are conscious that you are making changes, and you can confirm that you want to go ahead.
The Re-map labels function will look for:
All the cameras in your organisation
All images uploaded to those caneras
All result labels detected for your organisation’s images
WHERE YOU HAVE NOT YET INTERACTED WITH THE LABEL
In other words, where you have not yet edited, verified (either as correct or incorrect) or deleted the label
Where the current label is one of the species for which you have set up a FROM mapping
In our example, it will look for all Striped Hyena that you have not verified and turn them FROM Strped Hyena TO Aardwolf.
WildID will record the user who “edited” the label by choosing to Re-map labels.
In order to get the most advantage from this feature, a good workflow is to:
Set up your mapping initially
Bulk import a batch of images
Bulk detect your images
Once your detections are done, Re-map your labels in bulk
Now start to verify individual images and labels
As soon as you have interacted with a label, it will never be overwritten in any subsequent Re-maps that you do.
Export images
Admin users can export all images in the current search results from the Manage Images screen.
The images will be packaged into a single zip file, which you can download once complete.
See also Image exports. for complete information on exporting images in bulk.