Settings
Settings affect your entire organisation, and can only be accessed by Admin users.
Label mappings
Imagine you are working in an area where you only have Springbok, but no Thomson’s Gazelle. WildID sometimes detects springbok in your images as Thomson’s Gazelle. Instead of editing each misclassified label in each image individually, you can set up a mapping to re-map all Thomson’s Gazelle to Springbok in one go.
You can also use this feature to re-map species to a more specific level, for example re-mapping all Jackal to Black-backed Jackal, if that is the only species you have in your area (or the dominant species).
Label mappings only need to be set up once, and then can be used as the template to Re-map labels each time you import and detect a new batch of images.
See also Re-map labels.
Which labels in which images are affected?
WildID will not automatically re-map labels for you for each detection. Even if you have Label mappings set up, you will have to click on the Re-map labels button each time you want to re-map labels, so that you are conscious that you are making changes, and you can confirm that you want to go ahead.
The Re-map labels function will look for:
All images uploaded to those caneras
All result labels detected for your organisation’s images
WHERE YOU HAVE NOT YET INTERACTED WITH THE LABEL
In other words, where you have not yet edited, verified (either as correct or incorrect) or deleted the label
Where the current label is one of the species for which you have set up a FROM mapping
In our example, it will look for all Thomson’s Gazelle that you have not verified and turn them FROM Thomson’s Gazelle TO Springbok.
In order to get the most advantage from this feature, a good workflow is to:
Set up your mapping initially
Bulk import a batch of images
Bulk detect your images
Once your detections are done, Re-map your labels in bulk
Now start to verify individual images and labels
Can you have multiple mappings for the same species?
You can set up multiple FROM mappings TO the same species.
For example, you can convert both FROM Thomson’s Gazelle TO Springbok, and also FROM Grant’s Gazelle TO Springbok if you find that both are common misclassifications for Springbok.
You cannot set up FROM mappings from one species TO multiple species.
For example, you cannot go FROM Wildebeest TO Blue Wildebeest, and also FROM Wildebeest TO Black Wildebeest. WildID will not know what you want to do with each Wildebeest.
Add mapping
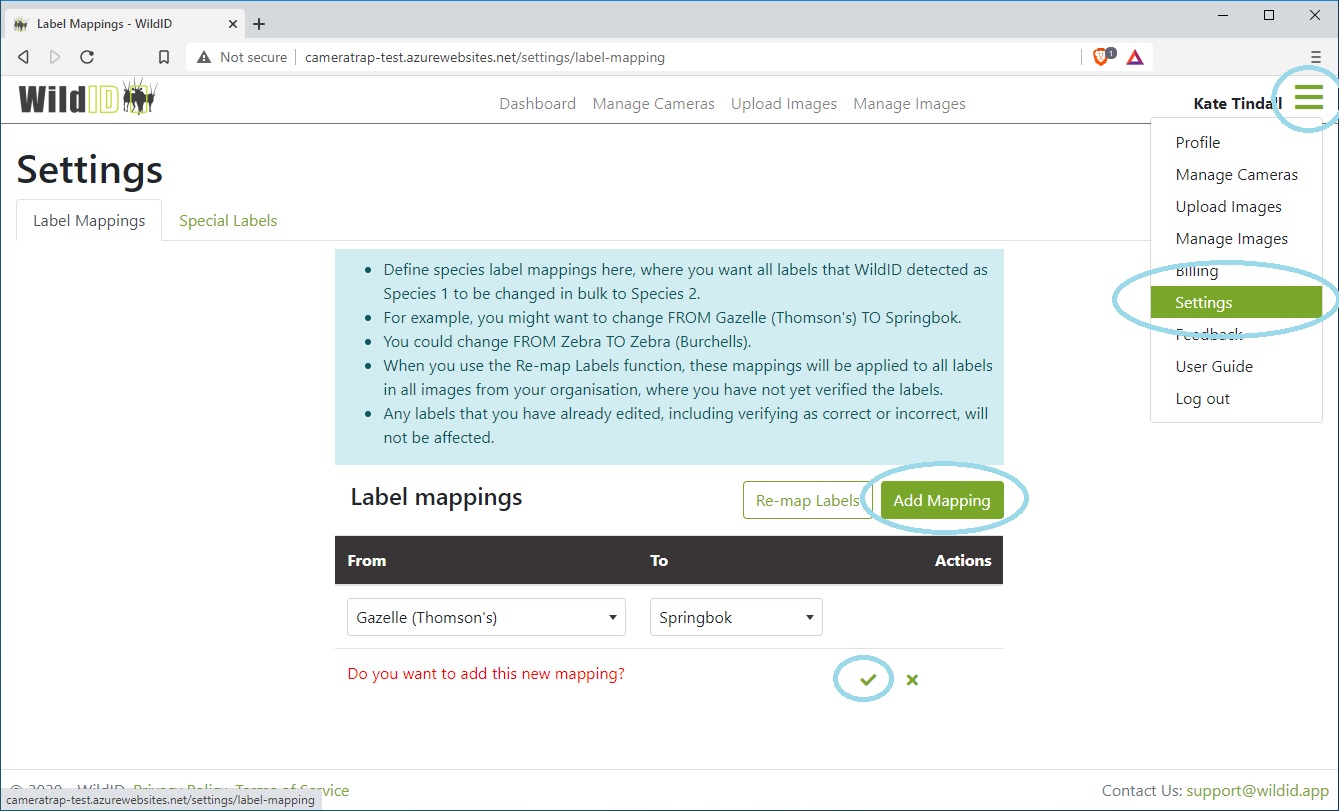
Find the Label mappings tab on the Settings page from the dropdown menu.
Click the Add mapping button.
Select your FROM and TO labels using the species dropdowns.
Confirm your save to add the label mapping record.
Continue to add as many label mappings as you like.
Edit mapping
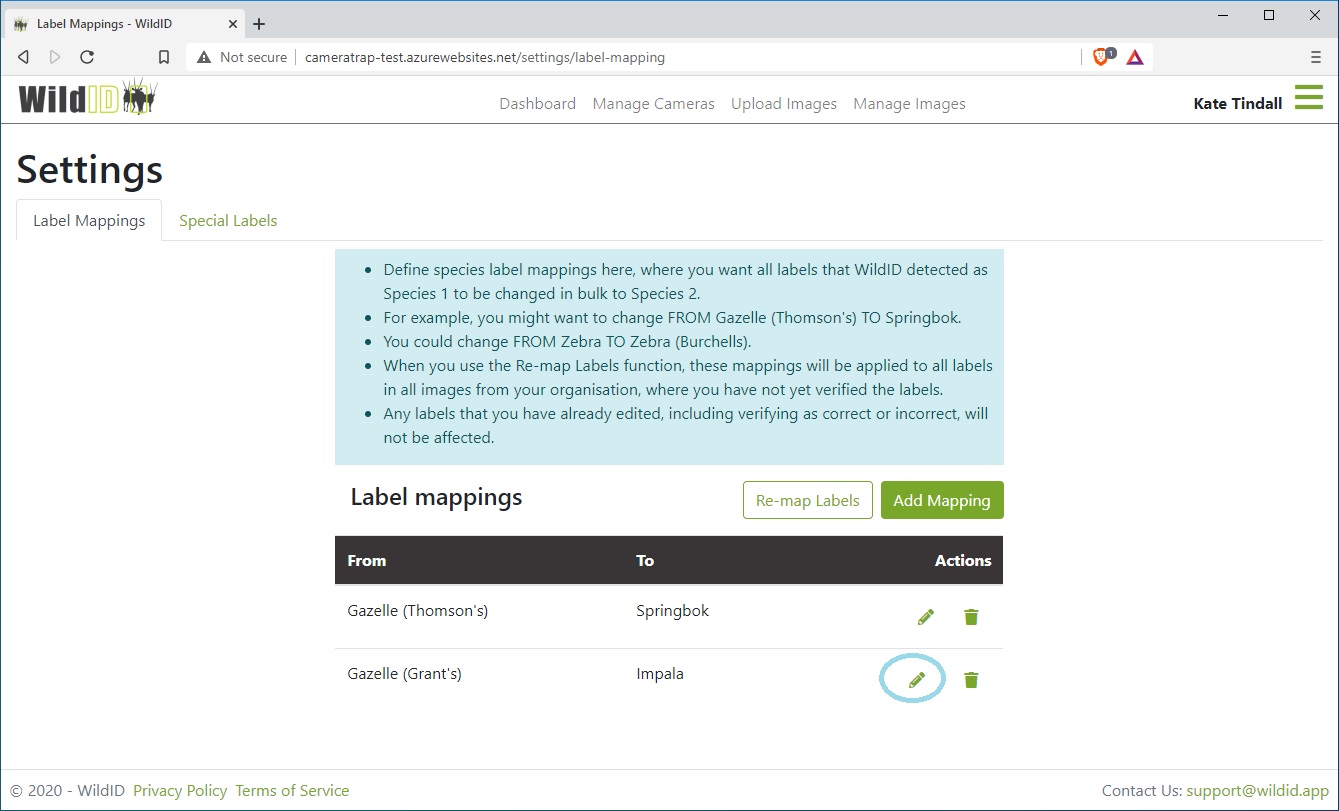
On the Label mappings tab of the Settings page, use the pencil icon to edit your label mapping.
Change either the FROM or TO label (or both) using the dropdowns.
Confirm your save.
Your new mapping will only take effect next time you hit the Re-map labels function. It will not affect past re-mappings already done.
Delete mapping
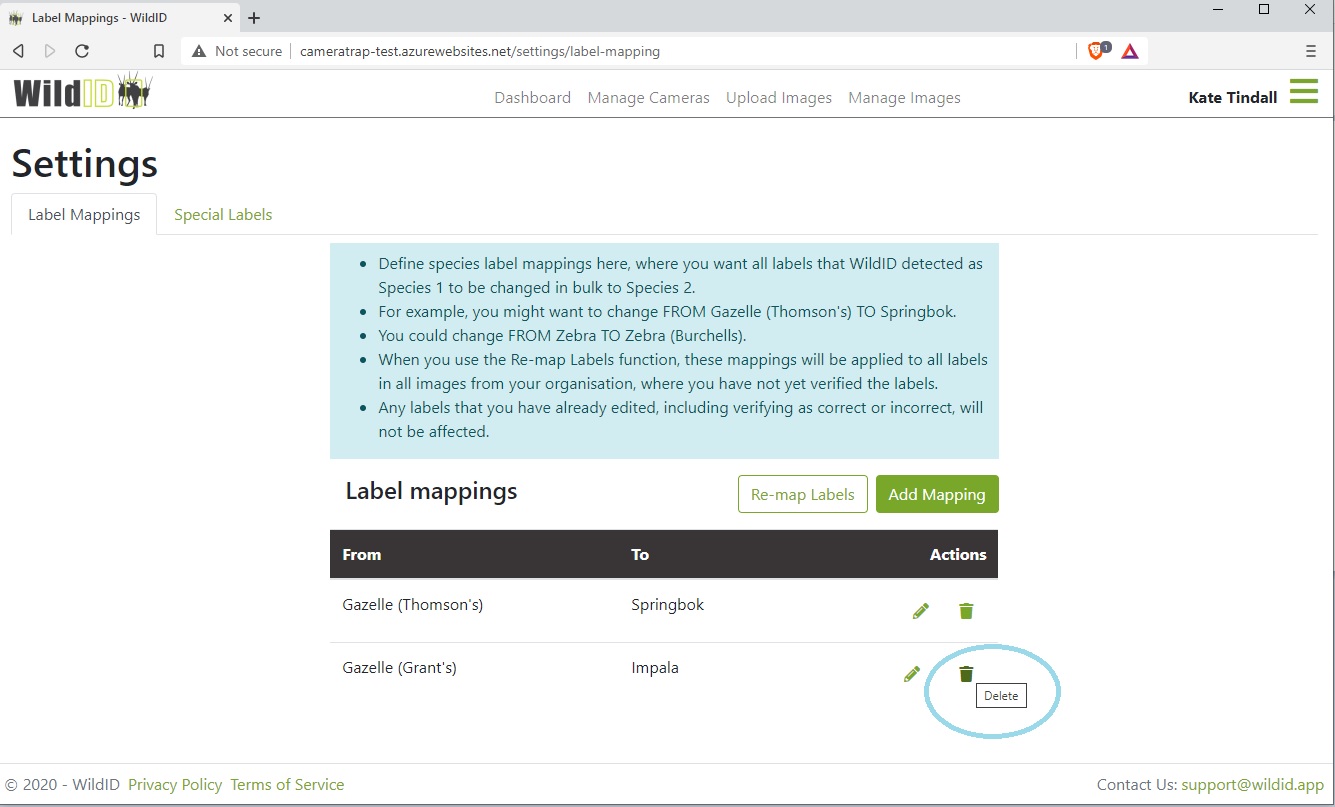
On the Label mappings tab of the Settings page, use the bin icon to delete your label mapping.
Confirm your deletion.
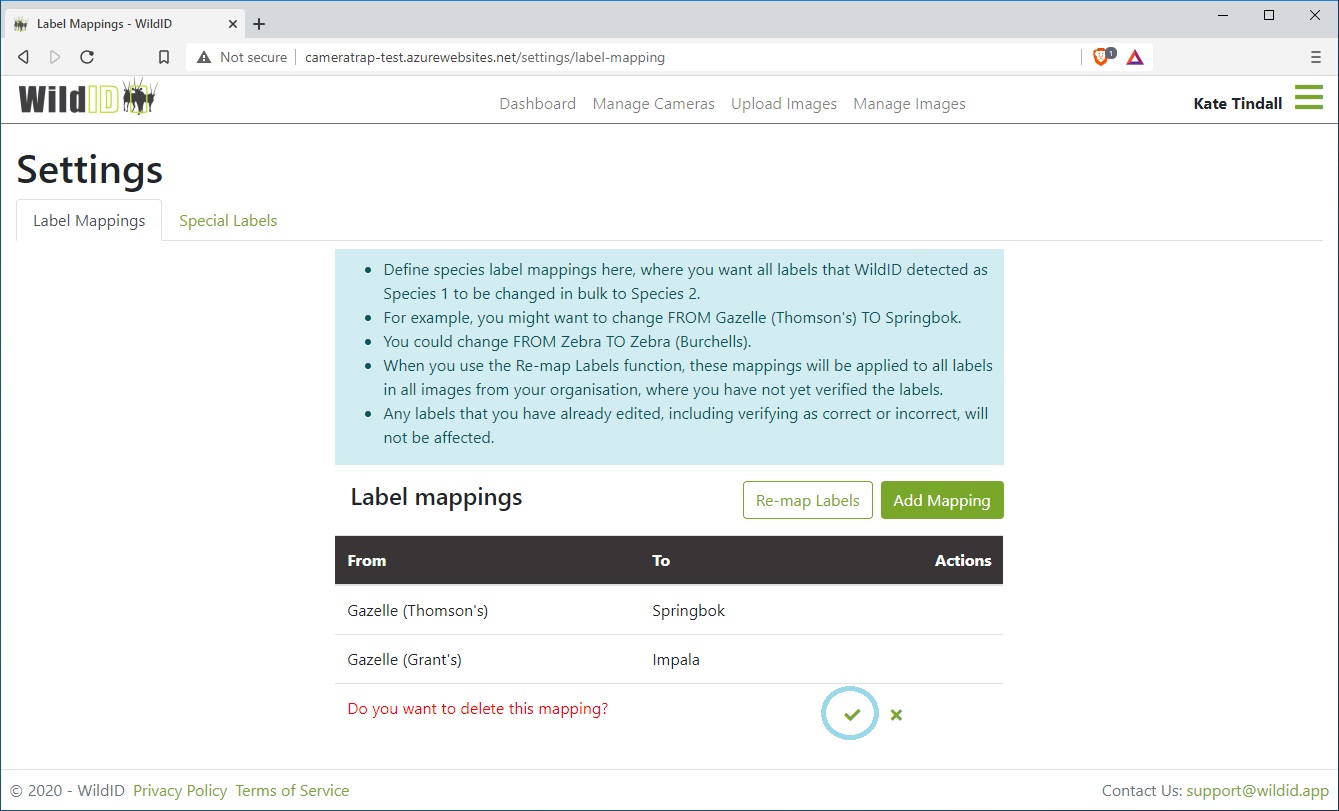
Your new set of mappings will only take effect next time you hit the Re-map labels function. Deleting a mapping will not undo past re-mappings already done.
See also Re-map labels.
Special labels
You can define Special labels for your organisation.
These special labels will then be available to tag any image from any camera in your organisation.
When you first create your Organisation, WildID creates the following Special labels to get you started:
Juvenile
Missing box
Noteworthy
You can then tag any photograph with a juvenile in it, and later search for all images with juveniles.
You can continue to use the default Special labels created for your organisation, or delete or edit them, or add your own new ones.
You might want to create Special labels to tag images with Collared animals for example, or to identify behaviour or condition of the animals, or to mark images as included in a specific project.
See also Image details: Special labels for adding special labels to images once you have defined them in Settings.
See also Filter and Search images for filtering to find images marked with a special label.
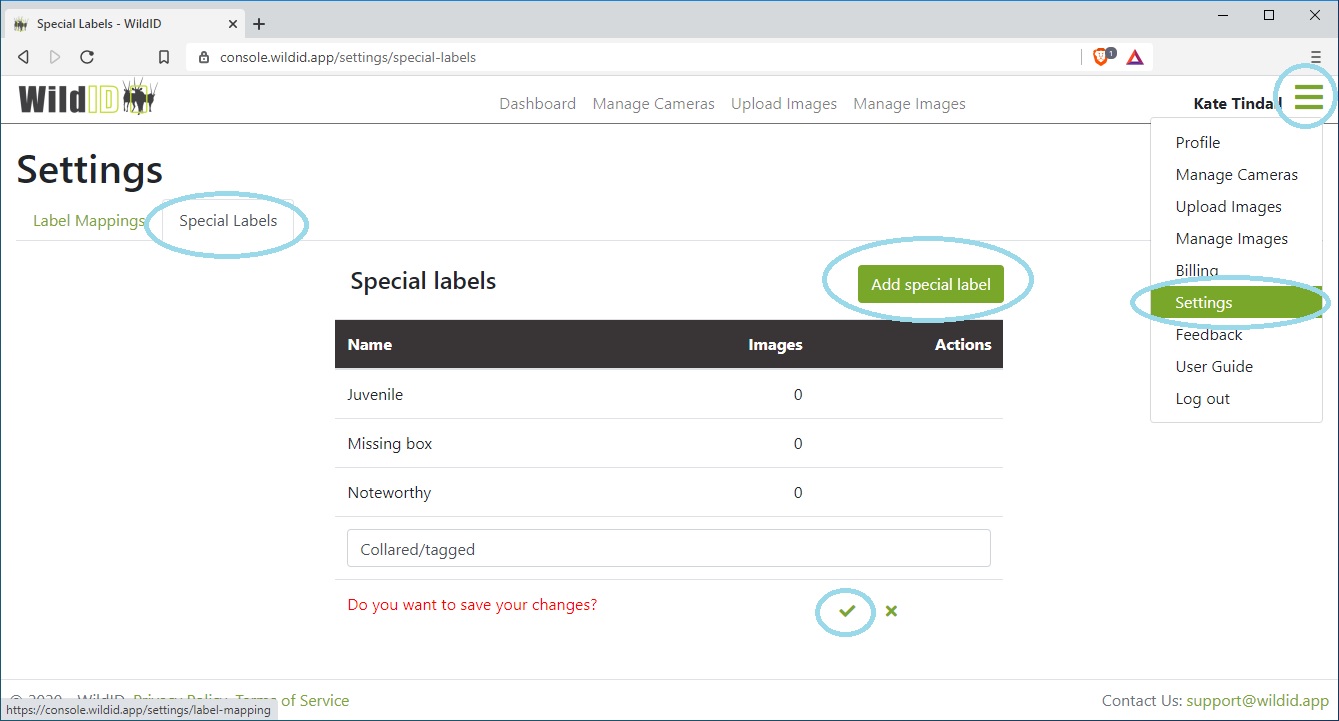
Add special label
In the Settings page, go to the Special labels tab.
Click the Add special label button.
Enter a name for your new special label.
Confirm your save.
Your new special label will now appear for use on the Image Details page for all your images, both old and new.
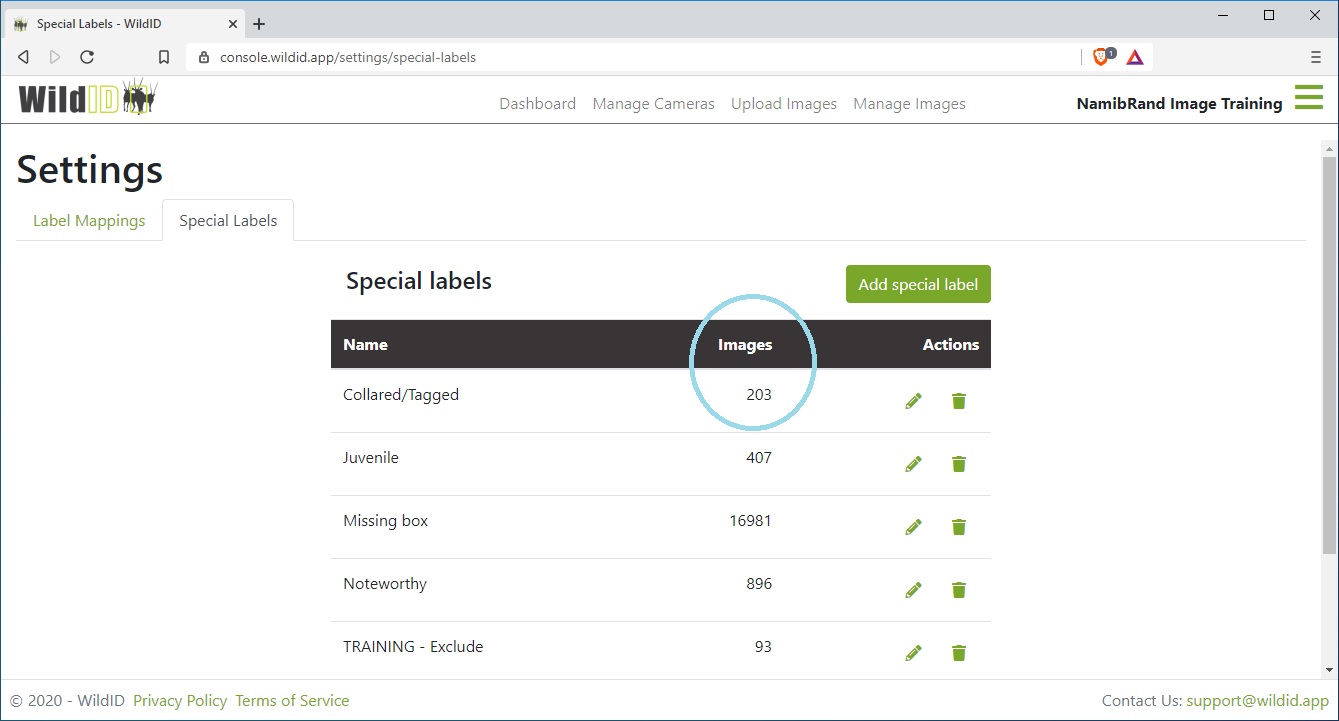
As you begin to use your special labels to tag images, a count of the images in which each special label is used will appear in the Special labels list.
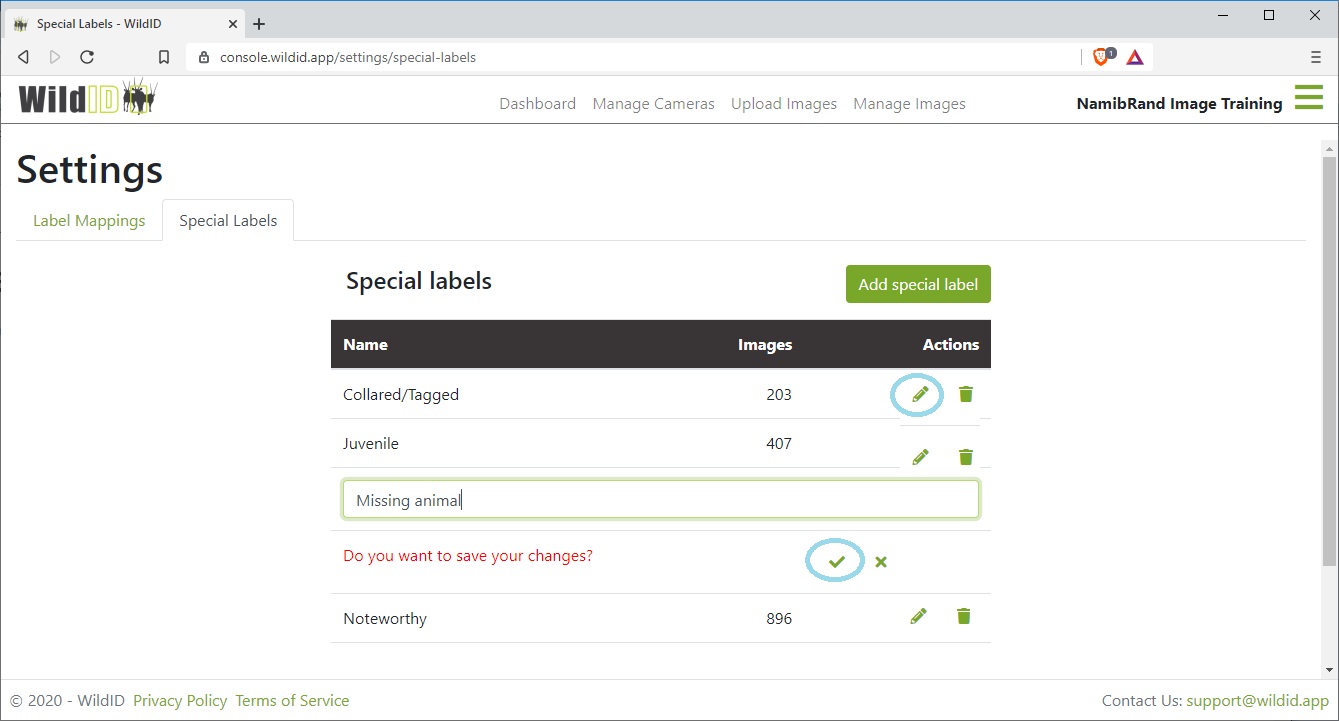
Edit special label
In the Settings page, go to the Special labels tab.
Click the pencil icon next to the special label you want to edit.
Change the name for your new special label.
Confirm your save.
Important note:
If you have already tagged some images with this special label, they will retain the tag, but show the new name of the special label. So you should only edit the name if you are keeping the meaning the same (if you have already tagged images with it).
For example, you could change the name “Juvenile” to “Young”, and it would still make sense on any images that had been tagged with “Juvenile”. But if you changed the special label “Juvenile” to “Male”, any images previously tagged as “Juvenile” would now be tagged as “Male”, which would not necessarily be true.
If changing the meaning, rather delete the old special label and add a new one.
Delete special label
In the Settings page, go to the Special labels tab.
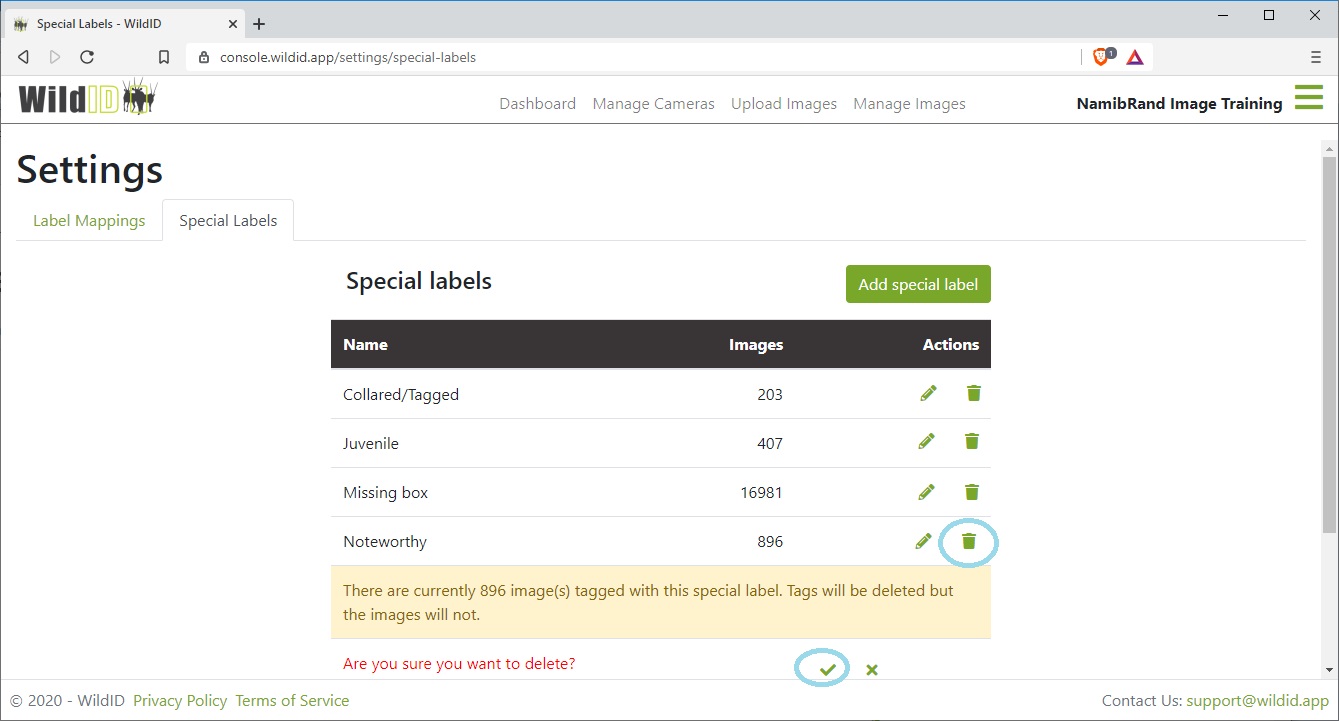
Click the bin icon next to the special label you want to delete.
Confirm your deletion.
Important note:
If you delete a special label that has already been used to tag images with, these tags will be deleted. The images will not be deleted, but they will no longer show the special label on their image details, or in searches or CSV exports.
WildID will tell you how many images have been tagged with a special label you are about to delete.
Individual labels
You can define Individual labels for your organisation.
Individuals are recognised individual animals, for example a particular leopard that you recognise from pattern matching of his spots, or an individual rhino recognised from ear notches.
These individual labels will then be available to tag any image from any camera in your organisation, and you can later search for all images of that individual.
See also Image details: Individual labels for adding individual labels to images once you have defined them in Settings.
See also Filter and Search images for filtering to find images marked with an individual label.
Individual labels can be for any species, but they will all appear in the same list together (to select from when tagging or filtering), in alphabetical order. If you intend to use individual labels for more than one species, to find the label easily and to avoid duplicates, consider a naming convention something like:
Giraffe_F1
Giraffe_F2
Giraffe_M1
Giraffe_M2
Leopard_F1
Leopard_M1 etc
Individual labels added to images can be written into the EXIF data of the image if you export your images for further analysis in other software packages.
Roadmap:
Currently WildID will not recognise individuals for you automatically. You will have to do so by viewing the image and tagging it with the individual name to capture the data, and have it available for later searches or analysis. However we are getting increasing numbers of requests for automatic individual recognition, and would like to look at building this into WildID in the future.
Add individual label
In the Settings page, go to the Individual labels tab.
Click the Add individual label button.
Enter a name for your new individual label.
Confirm your save.
Your new individual label will now appear for use on the Image Details page for all your images, both old and new.
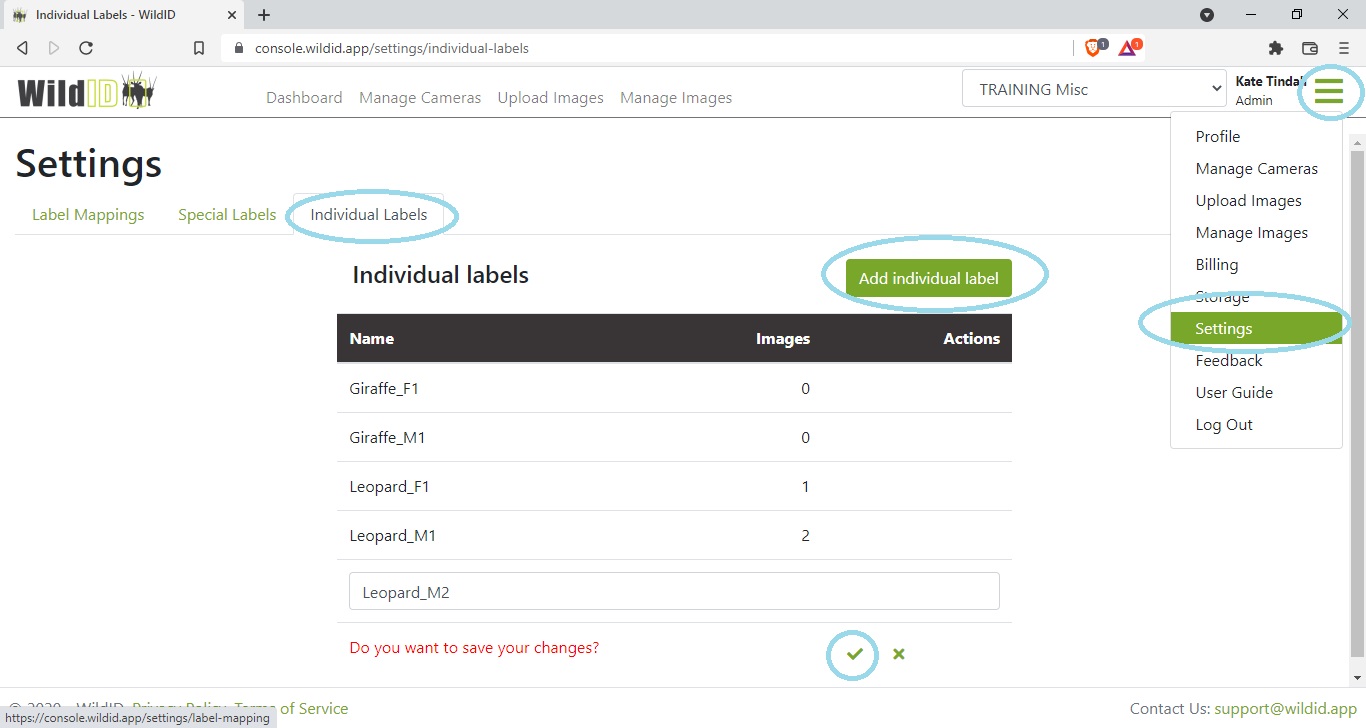
As you begin to use your individual labels to tag images, a count of the images in which each individual label is used will appear in the Individual labels list.
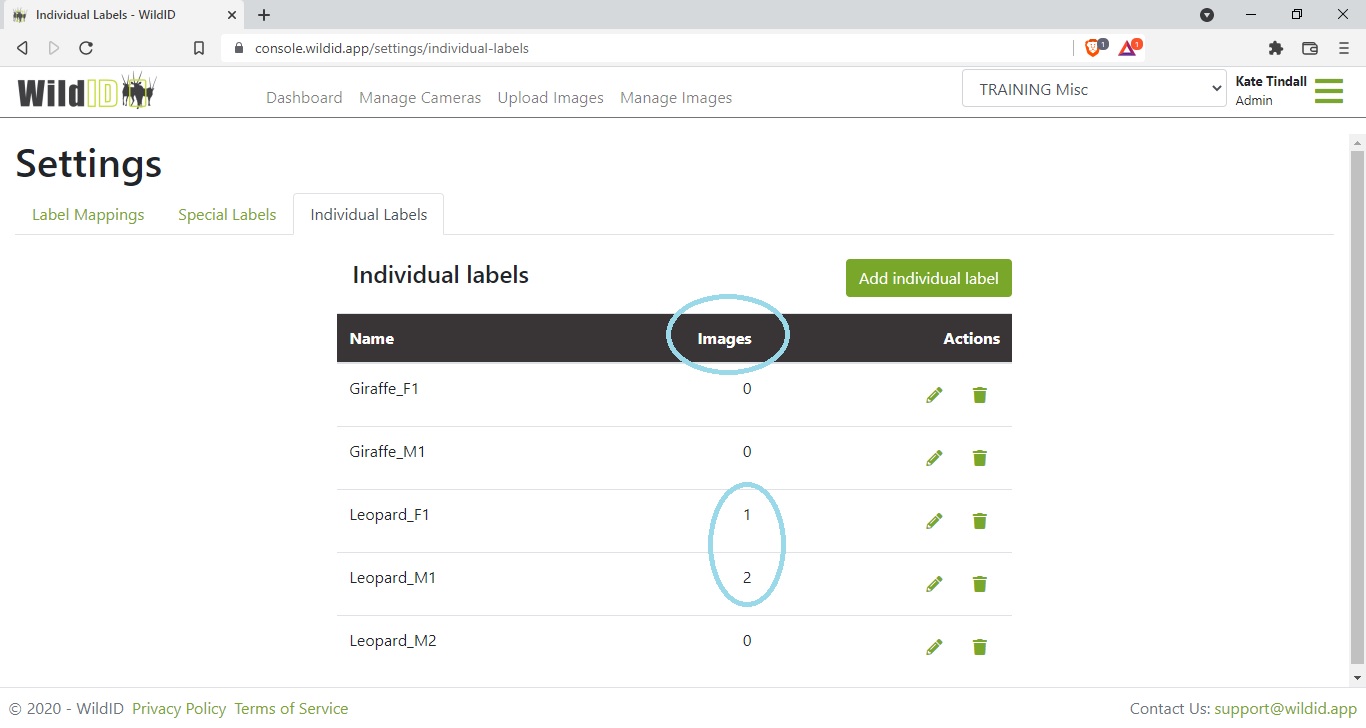
Edit individual label
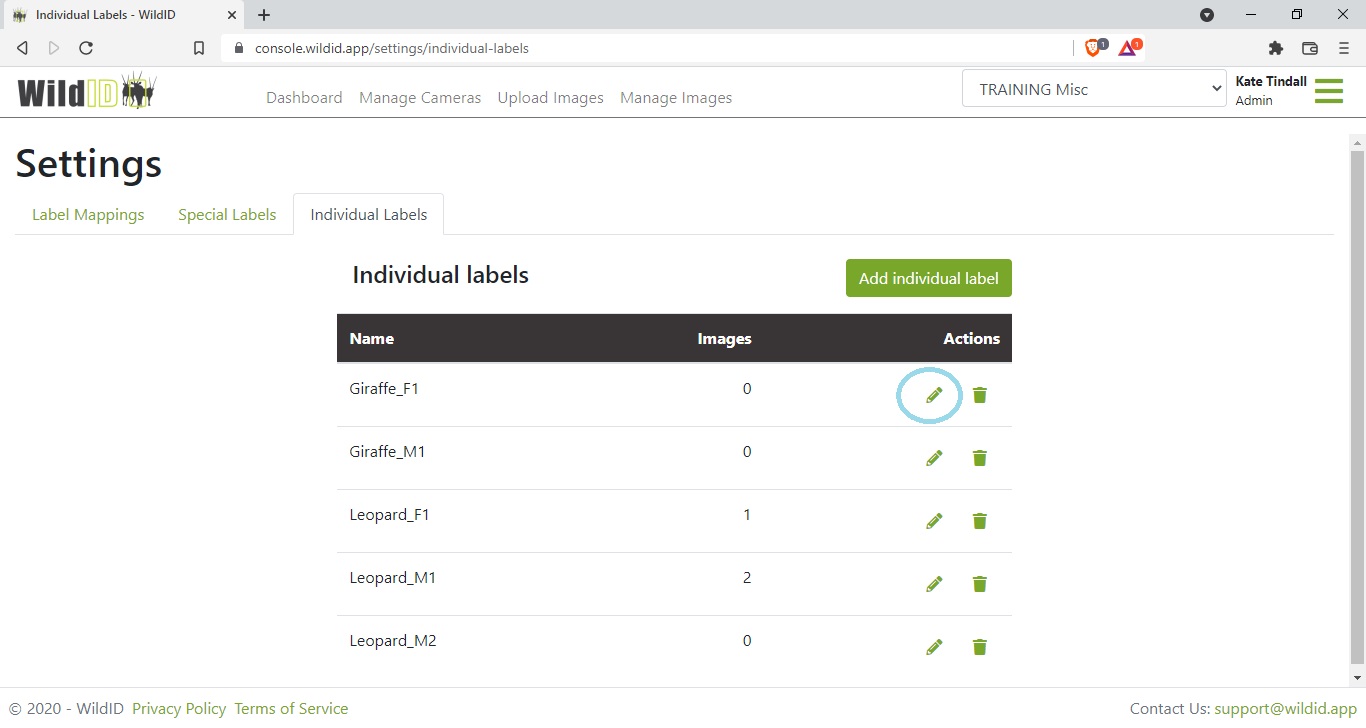
In the Settings page, go to the Individual labels tab.
Click the pencil icon next to the individual label you want to edit.
Change the name for your new individual label.
Confirm your save.
Important note:
If you have already tagged some images with this individual label, they will retain the tag, but show the new name of the individual label. So you should only edit the name if you are keeping the meaning the same - it still refers to the same individual animal (if you have already tagged images with it).
For example, you could change the name “Joe” to “M23” if you are redesigning your classification system, and the individual you used to know as “Joe” is now known as “M23”. But if Joe and M23 are different individuals, you should rather create a new label for M23.
Delete individual label
In the Settings page, go to the Individual labels tab.
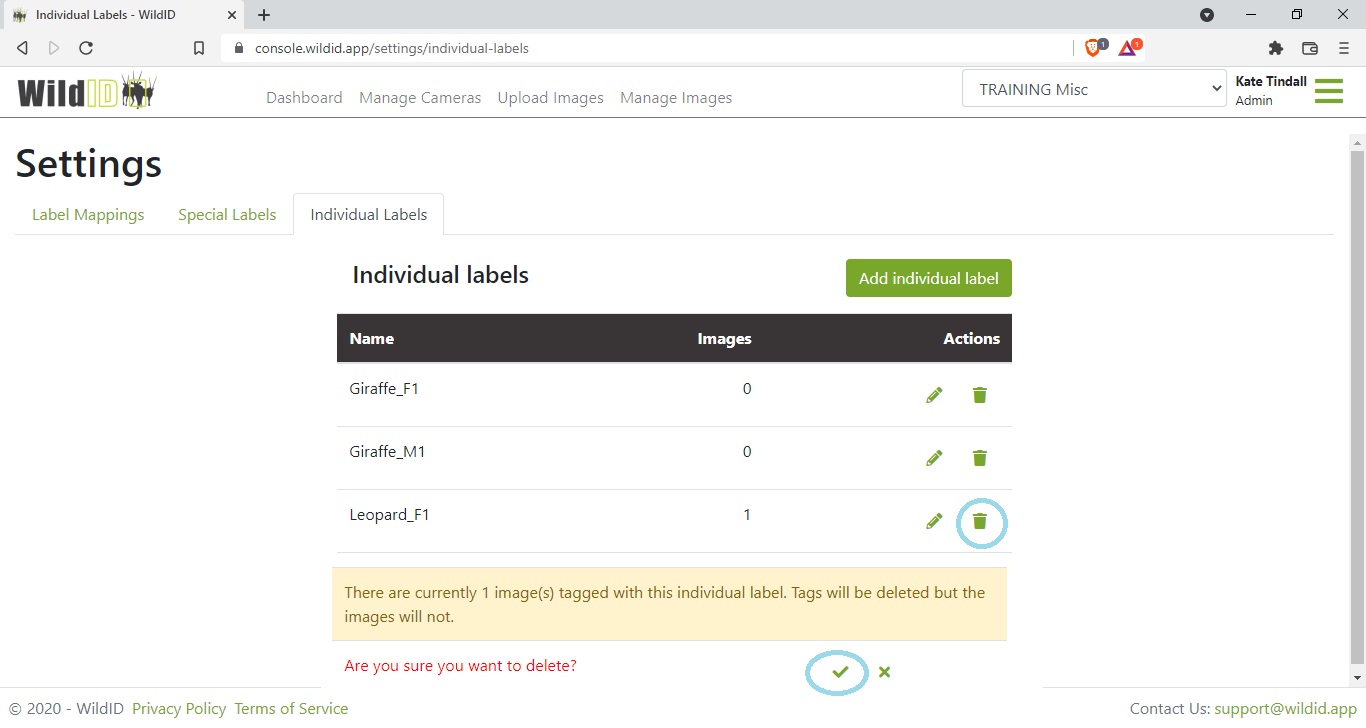
Click the bin icon next to the individual label you want to delete.
Confirm your deletion.
Important note:
If you delete an individual label that has already been used to tag images with, these tags will be deleted. The images will not be deleted, but they will no longer show the individual label on their image details, or in searches, or CSV or EXIF data exports.
WildID will tell you how many images have been tagged with an individual label you are about to delete.